Monday, October 31, 2011

Caramel Corn


All the boys had another guys weekend up in San Luis Obispo, so we got another girls weekend in Laguna :) Last time we had a picnic at The Montage and played croquet. This time, we had a girls slumber party and we made homemade ice cream and caramel corn! Believe it or not, I still think we ate healthier than the boys did this weekend, haha. 
Laurie shared her mom's recipe for caramel corn and it was soooooo good. And easy too! It only takes about 5 minutes of work to actually make it, but then it sits in the oven for about another hour before it's ready. Overall, I was surprised at how simple it was to make homemade caramel and get delicious crunchy caramel corn on demand!
Since our girls weekend, I've now made it again on my own. This time, Peter and I were entertaining friends visiting from SLO :) We played a domino game, 'Mexican Train', which requires extra game pieces to use as markers that you put on and off of your domino 'train'. However, in the absence of the game pieces, we used caramel corn as markers in the game. When someone earned a marker, they would grab a piece of caramel corn; and when they earned the right to take it off... they would pop it right into their mouth. It was a fun way to snack and play at the same time :) Between the handfuls that were eaten, and the 'markers' that were gobbled, the entire bowl of carmel corn was gone by the end of the evening!


Recipe:

  • 20-24 cups of plain Popped Corn (from about 1 cup unpopped kernels)
  • 2 cups Light Brown Sugar
  • 1 cup (2 cubes) Salted Butter
  • 1/2 cup Light Corn Syrup
  • 1 teaspoon Salt
  • 1/2 teaspoon Baking Soda
  • 1 teaspoon Vanilla
  • *(optional: 3 cups Peanuts)
Preheat the oven to 250 degrees Fahrenheit. Then pop your corn kernels. They need to be ready because once the carmel is ready, everything has to move FAST, so there's no time to waste popping corn.

I used the good old air popper that I grew up with. These have a max capacity of 1/2 cup kernels at a time, so I did two batches (totally 1/2 cup kernels) and this yielded a perfect amount of popped corn for this recipe (you will also need 2 big bowls for this amount of volume):


Once your corn is popped, start the caramel: 
Mix together the brown sugar, butter, corn syrup, and salt  in a large pot over medium heat.
Bring to a boil, stirring constantly. Boil for no more than 5 minutes:

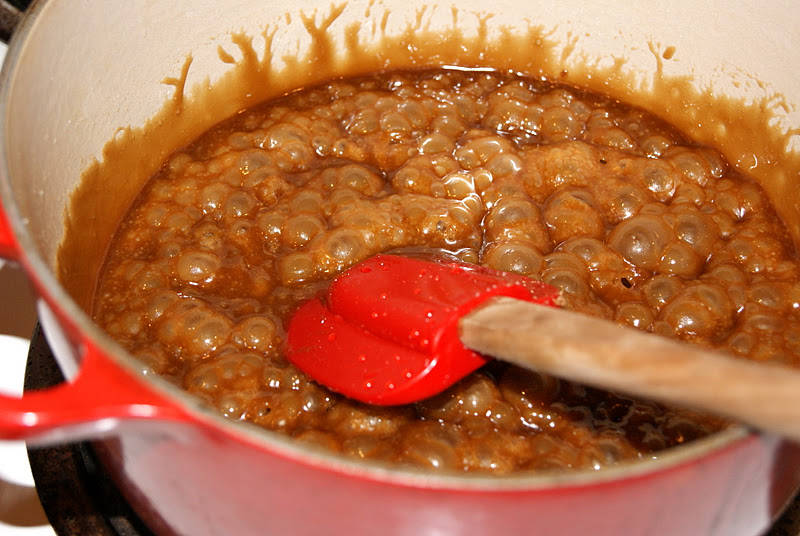
 After your caramel has boiled for just about 5 minutes, add the baking soda and vanilla. It will PUFF up and become light and fluffy... almost like marshmallow fluff, but not quite as thick and sticky. Once it is stirred, pour it immediately onto your popcorn...

 Gently stir the carmel by folding the caramel into the popped corn until it is well coated
(Stir in peanuts at this time, if using):


Spread the bowls of carmel coated corn over two baking sheets lined with parchment or silpat. 
Don't worry, I know it is still a bit sticky and clumpy at this time, but spread it out well, and it will eventually crackle apart after it bakes. 
Bake at 250 degrees for 1 hour to 1 hour 15 minutes, stirring half way. 

Once the caramel corn is done baking, spread over wax paper to cool and harden:

This only takes about 5 minutes for the caramel corn to cool until it is ready to enjoy!


It is such a yummy, crunchy, sweet treat, that it will disappear in just as much time as it took to make it... especially if it is part of game night :)

Friday, October 28, 2011

Chewy Molasses Cookies


I shared a story in my oatmeal bread post about the sweet, sticky, treat-- molasses! Oh I just love it! When Becky was teaching me how to make that oatmeal bread and was sharing her molasses story with me, I asked her if she knew of molasses cookies. She said that they love the molasses cookies from Trader Joes. On my next visit to Trader Joes, I headed over to the cookie bags and inspected their molasses cookies. How thick were they? What consistency did they have? Were they soft or crunchy? 
I came home and researched a TON of molasses cookie recipes. I got to pick and choose certain things I liked from each recipe, that I thought would yield the desired result.
Here is the final product for chewy, sweet molasses cookies. A great, rich (almost ginger snap) flavor for holiday cookie baking!

Recipe: 
¾ cup (1 ½ sticks) butter
1 cup packed brown sugar
¼ cup molasses


1 large egg

1 tsp cinnamon
¼  tsp nutmeg
¼ tsp salt
1 ½ tsps baking soda

2 cups flour

¼ cup granulated sugar for rolling

Cream together the butter, brown sugar, and molasses. Then mix in the egg, then cinnamon, nutmeg, salt, baking soda, and finally the flour:

Roll dough balls between your hands and then roll them in a bowl of granulated sugar. Place at least an inch apart on your cookie sheet:

Bake at 350 degrees for 10 minutes... they will look like puff balls, but take them out after no more than 10 minutes, and they will flatten out as they cool into their nice dense chewiness!

Let cool for a few minutes on a wire cooling rack. 

Saturday, October 22, 2011

Banana Pecan-Streusel Bread Pudding with Butter-Rum Sauce


Oh my goodness, what a mouthful of a name! Maybe I should have posted the rum sauce separately? It is definitely good enough to be a stand alone glaze; it would be good on ice cream alone, on poached fruit, or even cinnamon rolls... hmmm :)
One of my favorite restaurants is "K'ya" in Laguna Beach. They serve fun small plates so you can try several dishes from their dynamic menu. One of my favorite dishes is their Lobster Truffle Risotto... I will have to play around in my kitchen and figure out how to copy it so that I can share it with you.
However, K'ya also has one of my all time favorite desserts: Banana Pecan Bread Pudding. I LOVE bread pudding, but the first time I ate at K'ya, I didn't order it because I was bummed about the banana pecan part- HA! How foolish I was... when I finally tried it, a few visits later, I couldn't believe I had ever turned it down. They used to serve it with a rum sauce, but now they sometimes serve it with a different one.
I may not have figured out the risotto yet, but the bread pudding I have most definitely come up with a great way to recreate at home and I am excited to share it with you :) We even kicked it up a notch with a pecan-streusel topping! ('we' because that was actually Peter's idea!)


Whenever we go away on vacation or even just a weekend, it has become a tradition that I make banana bread when we return home. It's too perfect, buy bananas before you leave; come home and they are nice and over-ripe for making banana bread!


Last weekend, Peter and I went to visit San Luis Obispo...
(*side note: we stayed with our friends Matt & Alexa, and I must share her awesome etsy site with you! I love her beachy chic style!)
Anyway, when Peter and I got home from SLO, I made banana bread, of course. We enjoyed some toasty banana bread with breakfast the next morning. However, on our way home from work that night, Peter asked if I could try to recreate the K'ya banana bread pudding. We got overly excited and Peter got carried away with ideas of a crunchy top, and ice cream, and... I just LOVED the excuse to play in my kitchen! When we got home, I did some quick research and went to work :)


The nutty crunch on top complemented the dense, moist, sweetness inside. And the rum sauce...ooooh, it just made it all gooey and warm, and added yet another layer of flavor! One thing's for sure; this is a RICH dessert. We enjoyed ours with a side of vanilla ice cream and a tall glass of milk :)


Recipe: (for 2 large inidividual ramekin servings)


Bread Pudding:
  • 8 oz (1 cup) fat free evaporated milk
  • 2 eggs
  • 1/8 cup granulated white sugar
  • ½ Tbsp Vanilla
  • ¼ tsp cinnamon
  • 4 thick slices of banana bread (about ¼ loaf banana bread), cubed and toasted or stale
Pecan Streusel Topping:
  • 1/2 Tablespoon Butter
  • 2 Tablespoons Dark Brown Sugar, packed
  • 1 Tablespoon AP Flour
  • a few dashes Cinnamon
  • 1/4 cup Pecans, halved or chopped
Butter-Rum Sauce: (makes more than you need for bread pudding, but you can store the rest for another use, or cut the recipe in half)
  • 2 Tablespoons Butter
  • 1/3 cup white granulated Sugar
  • 1 Tablespoon Corn Starch
  • 1 cup Fat Free Milk
  • 3 Tablespoons Rum


First make the bread pudding custard mixture by mixing together the evaporated milk, eggs, sugar, vanilla, and cinnamon. 

Make sure your bread cubes are toasted: 

Then soak the toasted bread cubes in custard mixture: 

Transfer to buttered or sprayed ramekins. Place ramekins on a baking sheet or jelly roll pan to catch drippings.
Preheat oven to 350 degrees F. Do NOT put the bread pudding in the oven yet. Instead, let the bread soak in the ramekins while the oven is preheating and while you mix the pecan streusel topping....

Streusel topping:
Melt ½ tablespoon of butter in a bowl, add 2 Tbsp packed dark brown sugar, 1 Tbsp AP flour,  a few dashes of cinnamon, and ¼ cup chopped pecans. Stir together well.
Cover top of bread-filled ramekins with pecan streusel topping:

Bake at 350 for 30 minutes. Allow to cool for about 10 minutes. While bread pudding is cooling, start the rum sauce…

Butter Rum Sauce:
in a small saucepan, melt 2 Tbsp butter over medium heat. Add 1/3 cup sugar and 1 Tbsp corn starch together into the butter at the same time. 

Stir immediately until well mixed. –the result will look somewhat like a salt scrub

Let it cook, stirring, for about 30 seconds
Add 1 cup milk, stir well until all is dissolved together (15 seconds)

Increase heat to medium-high, and stir frequently as it starts to thicken and comes to a boil. (about 3 minutes)
It will boil and froth and increase in volume. Continue to stir. 

The sauce will eventually decrease in volume again as you stir, and it will become a slightly-thick liquid glaze consistency. (another 3 minutes)
Remove from heat and stir in 3 Tbsp rum. Let it sit for a few minutes, it will continue to thicken as it cools.

If you don’t allow both the sauce and the bread pudding to sit and cool for about 5-10 minutes, then the hot sauce will just run and melt right off of the steaming bread pudding right away.
Didn't wait long enough here...

...so I waited for it to cool a little more, and then it was perfect:

Pour rum sauce over slightly cooled bread pudding. Serve with a side of vanilla ice cream and a glass of cold milk. ENJOY!

LOOK at that ooey-gooey middle with the sweet crunchy top...

...and that sauce just tantalizingly dripping down!

Wednesday, October 19, 2011

Creamy Chicken Enchiladas


This is a quick and easy version of chicken enchiladas that packs a lot of flavor punch. I've seen recipes for 'creamy chicken enchiladas' that use either cream cheese or sour cream in the filling. To lower the calories and fat, I used nonfat plain greek yogurt instead of the other creamy ingredients that are higher in calories and fat. You still get all the cool, creamy refreshing flavor of the sour cream, but without the calories and fat. 
The nonfat, plain greek yogurt is one item that seems to always be on my grocery list nowadays. It substitutes SO WELL in place of sour cream in any recipe... it's unreal.

This recipe was a weeknight inspiration when I got home late from work and needed to whip up a quick dinner... before heading out again to see our new baby nephew that had just been born! Usually when these rushed evenings happen, I get a flood of 'oh crud' feelings and my adrenaline pumps, but some of my most creative and successful recipes come from those moments on the fly. On this particular night, I opened the fridge and saw a big bundle of cilantro. "That's it" I thought, "I'm going to use that cilantro and I'm going to use the greek yogurt to make quick, creamy, healthy mexican enchiladas". The rest of the ingredients I needed to make the enchiladas are just staples that I almost always have on hand (so you likely will too). It was a no brainer; boil the chicken. assemble enchiladas. bake. done. out the door. We even got to pack some up and take it to the hospital to share with the new parents!

Ingredients (makes one 9x13 casserole dish):
  • 3 cups cooked Chicken, shredded or cubed
  • 12 oz. plain, nonfat Greek Yogurt 
  • 1/2 cup chopped Cilantro
  • One 4-oz. can of diced Ortega Chiles, drained
  • 2 cups shredded Cheese, divided (I used a 4 cheese mexican blend, but you can use mozzarella, pepperjack, anything you like)
  • 1/2 cup diced Tomato, (or 1/4 cup Salsa)
  • 8 medium sized Flour Tortillas, OR 10 small Corn Tortillas
  • One 28-oz. can of Green Enchilada Sauce


Mix your 3 cups chicken, 12 oz. yogurt, 1/2 cup cilantro, ortega chiles, 1 cup cheese, and 1/2 cup tomatoes all together in a bowl.


In the bottom of your 9x13 baking dish, spread 1 large spoonful of the green sauce. This will keep the tortillas from baking onto to the dish.


Warm tortillas by wrapping them in a damp paper towel and steaming them in the microwave for a few minutes. This will make them pliable, so that they won't crack when you try to roll them up.


Stuff the warmed tortillas with as much of the creamy chicken filling mix as you can inside each tortilla. 

Roll them up and place seam side down in your sauced baking dish.


Once all your tortillas are rolled and nestled into the baking dish, pour the remainder of the green sauce over your little enchilada rolls.


Top with the other cup of shredded cheese (or more if you like) and bake, uncovered, at 350 degrees F for about 30 minutes, or until heated through and cheese is golden brown and bubbly on top. 


You can add or omit any ingredients you please. You really can't mess these up. It can even be as simple as just a little cheese and the chicken inside the tortillas and it will still be delicious and filling! Cover anything with sauce and cheese and you can't go wrong :)

Monday, October 10, 2011

Apple Dumplings

These are SO cute and so fun :) I have the original recipe for these from the Apple Farm Hotel and Restaurant. I've spoken about The Apple Farm in previous posts, but it is a special, quaint hotel/bakery/restaurant/gift shop in the small town of San Luis Obispo, where Peter and I went to college. They have the BEST bakery. 
Anyway, these apple dumplings are so fun the make, fun looking, and fun to eat!! They are like little apple pie bombs! I even used the same cute little leaf cutouts that I used on top of my apple pie to make these apple dumplings look like actual apples! Fun and festive looking, huh :)


Recipe: 
1 batch of Pie Dough
4 small Apples
enough Brown Sugar to fill core of apples
a dash of Cinnamon to top each apple
a dot of Butter to top each apple (OPTIONAL)


First, make your pie dough. While that rests in the refrigerator, tend to your apples:
Peel and core, OR peel, core & slice each apple. Again, I used my handy dandy apple peeler/corer/slicer):

When your apples are ready, divide your dough into 4 equal portions, and roll out each until about 1/4 inch thick or less: 

Place an apple into the middle of each round of rolled dough. 
Fill the core of the apple with brown sugar, and sprinkle the top with cinnamon:

*OPTIONAL: Put a pat of butter to plug up the top of the core. I did this on some and didn't do it on the others. Your choice...

Wrap up the apple to the best of your ability, trimming away excess dough & making sure that seams are sealed tightly. Use excess scraps of dough to make stems and leaves:

Bake at 400 degrees Fahrenheit for 20-25 minutes
As it bakes, the apple cooks slightly and the sugar mixture melts down and oozes through all the apple slices:

Yummy, Yummy, Yummy! The only thing these apple dumplings are missing, is....
 a big scoop of ice cream!


Enjoy this fun & festive dessert!

Wednesday, October 5, 2011

Classic Apple Pie


In my last post, I talked about how Peter and I went apple picking at Oak Glen with our friends Trevor and Laurie. It was awesome! The farms offer apple cider tasting, and they let you apple taste before you decide which type of apple you want to go get. The people there were SUPER friendly and helpful too; they taught me about ALL the different varieties of apples as I tasted each one. Tasting all of them at once really allowed me to tell which ones were sweet, firm, tart, strong, mushy, mild etc. 

My goal was to find out which was the best baking apple to make an apple pie. I will share with you what I learned; for baking, you want...
  1. strong 'apple-y' tasting apple rather than a sweet or mild tasting one. (that's literally the way they described the flavor to us, haha)...because, baking innately makes the flavor to become more mild, so if you started with an already mild flavored apple, your pie would definitely lack it's full flavor potential. 
  2. a tart apple rather than a super sweet one...because you want the sweet and tart balance in a fruit pie. If the apple is super sweet, like say a honeycrisp (which seems to be the crowd pleaser of eating apples), and then you add sugar to make it into a pie, it will be sickly sweet. 
  3. a firm crispy apple rather than a soft one...because, once cooked, the apples soften and the ones that already started off soft then bake to become too apple-saucey. 


In the end, the farmers helped us narrow it down to 2 different varieties: 'Spartan' apples and 'Pippin' apples. Both for their STRONG apple-y flavor, and for their firmness. Somehow we also got talked into 
buying like 20 lbs of apples! Laurie and I came home and got straight to work :)
(The red colorful ones are the Spartans, and the green ones are the Pippins)

Recipe: (makes one pie):
  • You can't really go wrong with an apple pie, so you don't really need a recipe. In fact, I didn't even measure the ingredients that I put into my pie filling. Just use these measurements as a general guide, but you can just eye-ball it to put as much or as little of each as you desire and as your apples call for. For example, sweeter apples need less sugar; some people don't like cinnamon or like more cinnamon; some apples are so tart that no lemon is necessary; etc.
  • 1 batch of Pie Dough
  • 12 medium Apples
  • 2 Tablespoons Lemon Juice
  • 2 Tablespoons AP Flour
  • 1/4 cup Sugar
  • 1 generous teaspoon Cinnamon
  • I didn't do this, but traditionally you slice a few Tablespoons of butter over the top of the apples if you would like to do it that way. 


Start by baking your pie dough. Then get your apple filling ready while the dough is refrigerating:


Peel, core, and slice your apples. 

Then toss with about 2 Tbsps flour, 2 Tbsps lemon juice, 1/4 to 1/3 cup sugar (depending on how sweet you want your pie and how sweet or tart the apples already are), and lastly a generous teaspoon of cinnamon. Toss together in a large bowl using your hands. (If your bowl is not big enough, just divide it into 2 batches :)


Fill your chilled pie shell with your apple mix. Firmly press all the apples into the shell and make it as compact as possible:
(This is when you would sprinkle a few tablespoons of cold, diced butter over the top of the apples before you put the crust over it all. I didn't do this, but you are certainly welcome to partake in the tradition.)

Drape the top-crust dough over your pie. Again, press down as you lift the edges to release air pockets. As the pie bakes, the fruit shrinks, and you don't want an air gap between the apples and the crust:
Trim off the extra dough while still leaving a 1 inch overhang. Tuck that 1 inch of dough around the pie underneath the edges and press tightly to seal all the way around. 

With a knife, cut a couple slits into the top crust so that hot air can release while baking. Sprinkle the top of the pie with a little extra sugar:


The pie crust edges cook and brown very quickly, so protect it with a pie shield or foil for the first 20 minutes of baking:


Bake at 400 degrees Fahrenheit for 20 minutes with crust edges protected, then remove foil or shield, and bake for an additional 15-20 minutes: 

Let the pie cool when it comes out of the oven. If you try to cut it and serve it right away, the filling will run out of the pie and fill the pie dish. Let it sit to cool and congeal before cutting.


Look at all those lovely layers of tasty cinnamony-sugary apples!

They're hard to see in the pictures above, but you can find the cute little cutouts that I have on the top of my pie at Williams-Sonoma.