Friday, March 25, 2011

'Home-Crafted' Mocha Frappuccino


Before the days of Starbucks' 'hand-crafted beverages', Diedrichs was the place to go! And when I was a little girl my mom used to take me out as a special treat to Diedrich's Coffee to get a blended mocha. We always thought it was funny that I loved coffee drinks so much and at such a young age- especially because my parents were never big coffee drinkers. I mean, they would drink it socially or with dessert on a special night out at a restaurant, but our home certainly never woke up to the smell of fresh coffee; in fact, I don't know if our family even owned a coffee machine when I was growing up! But my love for coffee started when my third grade teacher let me drink coffee out of her cartoon 'tasmanian devil' mug. Of course I didn't like the bitter taste of coffee at first, but I pretended to like it so that I could keep getting coffee in that cool mug that all of us kids coveted :) Eventually, I became that little girl who would sneak a cup of coffee at church when I got out of Sunday school before my parents... and before you knew it I was a full-blown coffee lover! I was all about coffee drinks, coffee ice cream, coffee candies, coffee EVERYTHING. Hence, when my mom and I would have 'mommy and me' days together, she knew it would be a special treat to take me out to get mochas together.  My dad called our drinks 'no fun mochas' because we would always ask for ours 'sugar free, fat free, and no whipped cream'.


When Costco started selling that mocha powder by Caffe D'Vita, we loved making blended mochas at home! Now, it is a special treat that I get to share with Peter. Whether it's a weekend treat on a hot afternoon, or if it's a fun dessert to sip on while we curl up on the couch after dinner, we really enjoy this blended treat. Give it a 'whirl' (no pun intended :) ...I'm sure you'll enjoy it too!


Recipe (for 2):

  • 2 cups Fat Free Milk
  • 3 heaping Tablespoons of Caffe D'Vita 'Mocha Cappuccino' powder (I've tried the 'French Vanilla' flavor, but I would warn against it).
  • 1 Tablespoon of Rich Chocolate Ovaltine (Don't make fun of me... I told you this started when I was young! hehe) -this chocolate brings out a deeper/richer flavor in the mocha.
  • 12 Ice Cubes


Pour your milk and your powders into the blender. 

Then blend it all together for a few seconds until it looks like you have chocolate milk.


Add the ice cubes and blend for 40 seconds or so (depending on the strength of your blender) until all the ice is finely blended. 
Eventually, the blades will spin so fast that they may hollow out a void around them and they will cease to blend the actually drink. If this happens (which it does to me every time), just turn it off, keep the lid on, and shake it or tap it down on the counter a little bit until that air pocket/bubble rises and explodes on top (hence, keep the lid on :) Then blend a few more seconds and pour into your cups!


Sip away on this delightfully frosty treat!

Helpful Hint: When cleaning the blender, I like to rinse out the glass carafe, then fill with hot soapy water and spin it on the blender for a little bit so that it can clean every little bit inside :) Then rinse again and repeat until your cleanliness OCD is satisfied :)

Tuesday, March 22, 2011

Fancy Pear Salad


In a weird roundabout way, the time change was the inspiration for this meal. I got out of work early and I was supposed to head home and start dinner. But it was a particularly hot day, and it was SO light outside from the time change that I could hardly begin thinking about turning on the hot oven and cooking a heavy meal. Instead, I scratched my original dinner idea and walked into the grocery store with a new game plan. I placed an 'emergency' call to my sister, who is the family keeper of the Nordstrom cookbook. I grabbed a few ingredients that I needed to complete the walnuts, vinaigrette, and ingredients that went into this salad. Then I was on my way to the most perfect and delicious salad for dinner. This is a great on all year long; even though pears are in season here from late summer to early fall, you can pretty much find pears at the store at any time of year.


Recipe (serves 5 as entree, or about 8 as a side salad)
10 oz Mixed Baby Greens lettuce/salad mix
1 Pear, sliced or diced
6 oz. Gorgonzola Cheese, crumbled
1/2 batch Candied Walnuts
3/4 cup Dried Cranberries
1 batch of Champagne Vinaigrette (drizzle sparingly and serve the rest on the side to add as desired)
*Optional- Chicken, if this is intended as the main dish


Toss all ingredients and plate it up this scrumptious chopped side salad:

Or have fun plating it up fancy:

Or serve it with a breast of grilled, sliced chicken for protein if this salad is to be your main entree:

Monday, March 21, 2011

Champagne Vinaigrette


This champagne vinaigrette recipe is from the Nordstrom Cafe cookbook, and it goes well with candied walnuts in a fancy pear salad. It is a super yummy salad and it is a great one to serve when you have guests because it is impressively 'fancy', yet so quick and easy to throw together since these ingredients are always available, and most likely already in your kitchen. This vinaigrette could not be a more delicious and easy homemade touch to your salad. You'll have to try it for yourself :)


Recipe (the recipe in the cookbook makes ALOT of dressing, so I halved the recipe for you here and it is still good for 6-8 individual side salads!)


1/2 small Shallot
1 small clove of Garlic, or 1/2 clove garlic
1 1/2 teaspoons of smooth Dijon Mustard
1 Tablespoon of Sugar
1 big pinch of Salt
A couple cranks of freshly ground Pepper (recipe calls for white pepper, I used black and it was great)
3/4 cup Champagne Vinegar (White Wine Vinegar is a fine substitute if you don't have Champagne Vinegar on hand)
3/4 cup Canola Oil (you can also use Grapeseed oil as it also has a very light flavor. However, I wouldn't suggest using Olive Oil because it has a strong flavor of its own that competes with the flavors of the other ingredients in this dressing; but I guess if it's all you have you can try it?)


**Nutrition Noteworthy: Canola oil has the least saturated fat of any cooking oil, and its high heat tolerance, neutral taste and light texture make it ideal for many culinary applications. The FDA authorized a qualified health claim for canola oil on its potential to reduce the risk of coronary heart disease when used in place of saturated fat.


Add all the ingredients (shallot, garlic, dijon, sugar, salt, pepper, and vinegar) EXCEPT the oil, into your food processor and blend until smooth. Then, while the processor is ON, slowly drizzle in the oil to form an emulsion:

It is a beautiful, smooth, ivory dressing!


The lightness of a vinaigrette works great with this fancy baby green salad, yet the pungent flavors in this dressing stand up well to the hearty ingredients of pears, walnuts, and gorgonzola. A little bit goes a long way, so start by drizzling sparingly and add more as desired.

Saturday, March 19, 2011

Easy Candied Walnuts


My family LOVES to eat at the Nordstrom Cafe. My favorite things there are their salads and their white chocolate bread pudding. Unfortunately they do not serve the bread pudding anymore, BUT we do have the Nordstrom Cafe cookbook. Today I am going to share with you the recipe for the candied walnuts from the Nordstrom cookbook. These candied walnuts are one of the things I love about their salads.


This time, I made these delicious candied nuts to be part of a yummy pear salad for dinner, but they also make a great topping for ice cream too! Each batch of this recipe makes about 2 salads worth. I like that because I just have to make it once, baggy half of it, and it stretches for 2 whole salads :)
(Peter thinks these make great snacks just straight out of the baggy, so I have to hide them well in my cupboards otherwise I'm afraid I'll plan another salad but pull out an empty bag! haha)


Recipe:
1 large Egg White
2 1/2 cups Walnuts (about 10 oz)
3/4 cup firmly packed brown sugar


Preheat the oven to 325 degrees F. Then, in a bowl, whisk the egg white to a semi-firm peak (so that there is NO liquid left in the bowl)

 Fold in the walnuts and the brown sugar until well coated:


Then spread the nuts on a cookie sheet that is lined with a silpat, parchment paper, or is prepared with a nonstick spray. Try to somewhat separate the walnuts so that they don't bake into a giant clump.


Bake in the preheated oven for 12 to 14 minutes. Immediately loosen them from the baking sheet and let them cool on a plate. (They only take about 30 seconds to cool and crunch up on the plate before they are ready to be used in the salad)


We crunched on these candied nuts in this super yummy pear salad (vinaigrette recipe here)

Thursday, March 17, 2011

Rich, Homemade Vanilla Ice Cream


After baking angel food cake, I had a bowl full of yolks that were begging to be made into some rich and creamy ice cream. When I buy ice cream at the store I usually opt for the 'double churned' and 'half-the-fat' type of versions... but for a special treat (and for the fun of making it) I am going to make the fully-leaded, real deal stuff. I make this ice cream just a couple times a year because 1) it's not a low fat treat, and 2) I don't typically reserve this many yolks at a time.


My sister-in-law, Ashley, was the first to start making ice cream in our family. Hers was so good, that both my sister and I went out and bought ice cream churners so that we could start making home made ice cream too! I was in college at the time and I had a ton of fun playing around with different flavors: cookies 'n cream, mint chip, espresso, toasted coconut, peanut butter cup, rocky road... and they all use this same vanilla base. This original base recipe came from Alton Brown, but I gotta give Ashley the credit for doing the grunt work in finding this killer recipe.


Ice Cream recipe (makes about 1 1/2 quarts (i.e. 6 cups)):
3 cups Half & Half
1 cup Heavy Cream
1 1/8 cups Sugar
8 egg Yolks
2 tsp Vanilla


First, combine the half & half and the heavy cream in a large pot over medium heat. Let this simmer and thicken for about 15 minutes.


While the creamy-mixture is simmering on the stove, whip together the egg yolks and the sugar until it is a pastel yellow color, and smooth & 'ribbony' when you drizzles from the lifted whisk.

Slowly temper the egg mixture by adding 1 cup of the hot cream at a time stirring together well in between each added cup. Otherwise the eggs will cook up/scramble if you add in all the hot cream at once.

The tempered egg-cream base will look like this:

Then pour it all back into the same pot:

And bring it up to a simmer over medium-low heat, stirring constantly. Do this for about 30 minutes or so until this base thickens; eventually you should be able to leave a finger streak on the spoon and it will stay there :)

Finger streak after about 10 minutes (not quite prominent enough yet):

Finger streak after about 20 minutes (this is okay, and you could stop here, but I decided to keep mine going):

Finger streak after about 30 minutes or so (finger streak is very nice and prominent and the ice cream base is nice and thick, almost custard-like:
**See how mine looks like it is starting to clump up a bit, this is because I was impatient and I turned up the heat on mine. Don't do this. It's actually fine and it will still churn into smooth ice cream, but you will get a smoother custard if you let it simmer low and slow.

Pour your finished ice cream base into a bowl and stir in the vanilla. Cover this bowl with plastic wrap and store in the fridge overnight so that it can completely cool before it is churned.

I keep my freezer bowls stored in double bags so that no freezer burn or frost gets in the bowl and into my ice cream.
Assemble your ice cream machine with the frozen freezer bowl:

Turn on your machine and carefully pour your ice cream into the opening in the top of the machine.

Watch your ice cream churn and transform from a fluid base...

...to a thicker cream...

...to a 'soft serve' consistency (and it starts to expand above the level of the freezer bowl since churning it adds volume to the ice cream :)

Turn off the machine, and remove the churning paddle (be sure to get all that ice cream off of it :)

Scoop out all the ice cream with either a wooden or rubber utensil (metal utensils will scratch and ruin your freezer bowl). You can enjoy your ice cream now as soft serve...

Or freeze it until it becomes the consistency of the real deal stuff :)

We enjoyed ours over some warm brownies...mmmmm!!!!

Monday, March 14, 2011

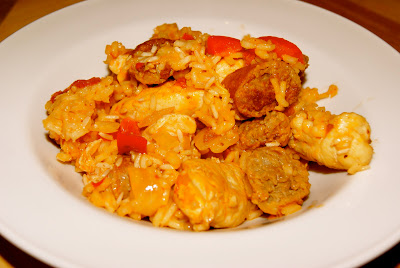
Comforting Southern Jambalaya


This past week was 'Mardi Gras'! Mardi Gras is a large festivity in southern culture; it is a time for celebration and feasting on fatty and rich foods before it is all given up for lent. I found it as a fun excuse to make a southern dish and celebrate with a dinner party, even though I do not practice lent, nor are there any Mardi Gras parades or celebrations in Orange County :) 

Jambalaya is traditionally a spicy cajun dish made up of chicken, andouille sausage, and shrimp cooked in a pot with rice and the 'trinity' vegetables (bell peppers, onions, and celery).  My version of jambalaya is sans shrimp, but you could easily add it in (I will note in the recipe where to add it in if you wish to do so). In addition to this, though Mardi Gras is about fattening feasts, my version of Jambalaya is not such a 'fatty' one. I opted for fat free, low sodium chicken broth and a lean turkey sausage. I wanted to enjoy the rich flavor of southern comfort foods, but without all the fat. This jambalaya is fun, filling, and packed full of flavor!

Shopping List (for 4 large servings):
  • 1 lb spicy Sausage (I used a lean Turkey 'Hot Italian sausage', but you could go for the more traditional Andouille pork sausage or any other sausage you wish)
  • 8 Chicken cutlets (2 per person, so add accordingly if you are cooking for more)
  • ground Black Pepper, to season chicken
  • 1 large Bell Pepper, diced (it traditionally uses green, but I used red because it's sweeter and I like the sweet contrast in my spicy dishes-- you can use whichever you like)
  • 1/2 large Yellow or White Onion, diced
  • 2 or 3 large Celery stalks, sliced
  • 1 1/2 teaspoons minced Garlic
  • 1/2 teaspoon Cayenne Pepper
  • 1 can Diced Tomatoes
  • 4 cups Chicken Broth
  • 2 cups long grain Rice (I used white, you can certainly use brown)
  • Grape Seed Oil, for browning and sauteeing (I like to use grape seed oil because it has a higher flash point and it is almost flavorless in comparison to olive oil, but you can use any oil you prefer)
  • ***Optional: peeled shrimp, additional cayenne or red pepper flakes for more spice.


If your sausages are precooked, then you can just slice them and skip this step. If your sausages are raw, then heat some oil in your pot to brown the sausages and allow them to cook through so that you can slice them.

Add more oil into your pot and heat it up so you can continue to brown your sliced sausage.

Once your sausage medallions are browned, remove from pot, add more oil, season your chicken with black pepper, and brown the chicken in the same pot. (they will pick up some of that nice spicy flavor that the sausages left behind).

Once your chicken is all browned on both sides, remove from pot and add all your diced 'trinity' veggies. Let them saute together over medium-low heat for a few good minutes until they are sweet, soft, and translucent:

After your veggies are all done, add in the can of diced tomatoes, the minced garlic, and the cayenne pepper. Give it a good stir so that all the flavors are mixed together :)

Then add the sausage and the chicken back into the pot:

Add your 2 cups of rice, and 4 cups of chicken broth:

Bring the pot to a boil over high heat, then fit tightly with a lid, turn the heat to LOW, and let it cook covered for about 20 minutes (If you wish to add shrimp, add it into the pot here during the last 10 or the 20 minutes that the rice is cooking). Then turn off the heat and let it sit for another 5 minutes with the lid ON so that the rice can complete cooking and soaking up all the yummy flavors.

After your rice is done, remove the lid and look at the beautiful, bright, and flavorful dish that you have made! 
In addition to super easy cleanup, one of the benefits of a 'one pot meal' is that none of the flavors are lost; all the flavor stays in the same pot and seasons the whole dish! The spicy sausage that was browned in the beginning successfully shared its sesonings with everything else added into the pot after it, and then the rice got to soak up all the yummy flavors while it cooked :) Hardly any additional seasoning was even necessary.

Stir it together and plate up a big yummy serving!