Showing posts with label Beef. Show all posts

Wednesday, January 18, 2012

Baked Spaghetti 'Pie'


This one was so much fun to make! It's like a facelift for spaghetti! It could also be a great way to use leftover noodles :)

Peter called me when he got off work and said that he had invited some friends over for dinner. This was a great quick dish to throw together. Luckily, I already had a batch of my homemade bolognese sauce, but if you're really in a rush for time you could make a quick marinara sauce, (or let's be honest- when in a real bind there is no shame in reaching for a good jar of red sauce from the market!)
In any form, this is a delicious and easy entree to whip up. Plus, isn't it so much more fun than plain old spaghetti?!!

Comments from the boys were: 
-"This is so much easier to eat than spaghetti, and it tastes better too!"; 
-"This is so good!...Megan, did I say yet how  good this is!?"; and finally- 
-"Best homemade meal I've had in a long time!"...but that was coming from the boy that just got back from a 'boys trip' in Mexico, so I don't think this one counts, Haha!

This night the three guys took down the whole thing, but I'd say it could normally serve 6 people comfortably- (not counting big hungry boys as normal people, of course)

Ingredients (makes 1 large pie; 8 slices)
  • 6-8 ounces Spaghetti noodles, cooked al dente
  • 2 Tablespoons Butter
  • 1/3 cup grated Parmesan Cheese, plus 1/4 cup for topping
  • 2 whole Eggs
  • 1 (16 oz) container of Fat Free Cottage Cheese (or you can use ricotta cheese. I opt for cottage cheese because it is healthier and tastes just as good when it's all cooked in; those who don't normally care for cottage cheese don't even know it's in here and they love it.)
  • 1 heaping cup of Shredded Mozzarella, plus 1/2 cup for topping
  • 1/2 batch Bolognese sauce, or Marinara Sauce, or your favorite jarred sauce.

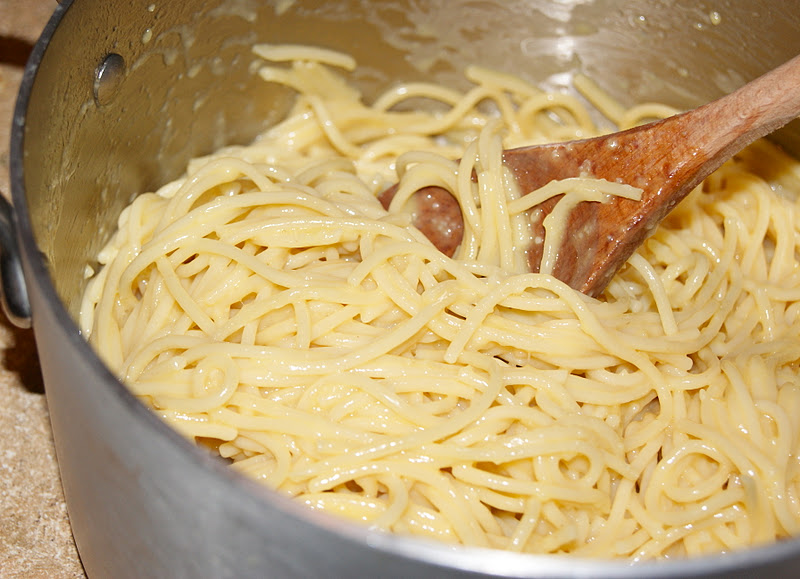
Cook pasta 'al dente'; drain; While still hot, stir in 2 Tbsp Butter, 1/3 cup grated parmesan cheese and 2 eggs; Mix well.
The cheese and butter mixed into the noodles give lots of flavor to this bottom layer of the dish; the eggs  hold it all together as it bakes so that later you will be able to cut it into nice slices without the noodles flopping all over the place. 
Lightly spray or butter your baking dish, and press noodles firmly into bottom of oven safe dish. (I use this Le Creuset pan, but you could use a casserole dish, a large pie pan, ...any oven safe baking dish)

Mix cottage cheese with 1 cup shredded Mozzarella and press firmly on top of noodles.

Layer your sauce on top of the cheese mixture. I used my homemade bolognese sauce, but you could always use a simple marinara if you are looking for a meatless entree. 
If you want to make this 'spaghetti pie' look like a 'pizza pie', you could also use a simple marinara sauce, top with mozzarella, and then top it lastly with slices of Italian sausage (or any pizza toppings for that matter) to turn this spaghetti pie into a 'spaghetti-pizza pie'! 


Top with a final covering of 1/2 c. mozzarella and 1/4 c. parmesan:


Bake at 350 degrees Fahrenheit for about 45 minutes, or until your cheesey top becomes golden-brown and bubbly!!! Mmmmm...


Slice into wedges to serve. Mangia! 

Tuesday, January 17, 2012

Bolognese Sauce


I've posted a recipe for a quick marinara. But this is FAR different from marinara. Marinara is a simpler, thinner, tomato-based sauce (traditionally meatless, but can be optional); Bolognese is more complex, thick, chunky meat-based sauce... meat not optional. Sorry, without meat it's just not bolognese. If you don't want meat, by all means, you can always use this recipe as a tomato sauce without the meat (but then it's not bolognese), or you might opt just to make a simpler marinara.

Bolognese is most commonly served with tagliatelle noodles, which are long wide noodles- like lengths of ribbon. But this chunky meaty sauce is also good with rigatoni or any big noodle that the sauce can grab onto and be stabbed up with a fork :)
Recipe:

  • 1 medium Yellow Onion, finely diced (about 1 heaping cup)
  • 2-3 ribs of Celery, finely diced (about 1 cup)
  • 2 Carrots, finely diced (about 1 heaping cup)
  • 1 lb lean Ground Beef (at least 1 lb... bolognese is supposed to be a MEATY sauce- not a tomato sauce with a little meat in it.)
  • 3 cloves Garlic, minced (about 1 Tbsp)
  • 1/2 teaspoon Salt
  • 1 cup Dry Wine- I like to use red (either red or white would be fine; I've seen both used interchangeably in bolognese recipes)
  • 1 (28 oz) can Whole Plum Tomatoes
  • 1 (6 oz) can Tomato Paste
  • 1 teaspoon Sugar, either White Granulated or Brown Sugar would be fine
  • 1 1/2 teaspoons of your favorite Italian Seasoning blend 
  • 1/4 teaspoon Ground Black Pepper
  • A dash of Nutmeg
  • 1/2 cup Fat Free Half & Half (traditionally whole milk or cream, but I like to substitute the half & half)

Dice the onion, celery and carrots as small as you can. Then place them in a food processor for a few seconds to mince them even further: 

(I suppose you could try using a blender for this if you don't have a food processor? I would definitely put the carrots in the bottom if you do that though)


Heat 1 Tbsp olive oil in a large heavy-bottomed pan. Sauté all your diced veggies for about 10 minutes until soft and fragrant- about 8-10 minutes. 

Add ground beef, minced garlic and 1/2 tsp salt. Break up beef with wooden spoon and stir to brown until meat is all cooked. About 5 minutes.

Add the cup of wine and stir in, scraping the bottom of the pan. Let it come to a simmer, stirring occasionally for about 5 minutes. 
Then add the can of whole tomatoes, including all liquid. 

Break up the tomatoes with your wooden spoon, and stir in the tomato paste, sugar, pepper, Italian seasonings, and nutmeg. 
Stir together well, and let it come to a bubbling simmer.

Turn the heat down, and allow to simmer for about 1 1/2 to 2 hours with no lid. Stirring occassionally to make sure it doesn't scorch on the bottom. 
*(This is why a heavy bottomed pan is important. If the pan is a thin/light material, the sauce will scorch easily onto the bottom of the pan so you would need to stir more frequently)
See how nicely it has thickened and how meaty and chunky it is:

After it has simmered and all the flavors have condensed together, turn off the heat and stir in the 1/2 cup of FF half & half. This gives it some rich, creamy depth and makes it a little more sauce-y again :)

Some Alteration Options:
  • Tomato: If you want your sauce a little more tomatoey, you can add another can of whole tomatoes, either a 14.5 oz can or another 28 oz can -depending on your preference, with its liquid. This would, however, require some additional simmering time. Or you can add a can of crushed tomatoes with your whole tomatoes.
  • Cream: If you want your sauce a little more saucey and/or creamy without adding too much tomato (to keep with the traditional bolognese fashion of little tomato), you can stir in more half and half (or whole milk or cream) at the end instead of just 1/2 cup. 
  • Meat: Traditionally, Bolognese uses chunks of Skirt Steak and pancetta so you can always go that route. I use lean ground beef to make it slightly healthier (and easier). Or you could make it even healthier by using lean ground Turkey. So now you've got the whole spectrum of meats to choose from.
  • Consistency: If you would like to make it a little more loose and saucey without adding extra tomatoes or cream, you can add a cup or so of beef stock before it simmers. This will definitely give more depth to the sauce while lightening up the consistency, and without diluting or adulterating the traditional flavors.

Thursday, December 15, 2011

Slow Cooker Pot Roast


This is a hearty, warming, winter meal. It just doesn't get any better than that... actually, it does- because you don't even have to cook it! Just dump it all in the crock pot and it cooks itself!  You can be at work all day, or be out Christmas shopping all day, and walk into an inviting & delicious smelling house at the end of the day. All you have to do is turn it on and walk out the door :)


This is a one pot meal, unless you decide to make the extra gravy... which is SO worth it. Just one extra pan and 5 extra minutes for that extra special homemade taste.


This roast tastes just like the pot roast Nana used to make in her pressure cooker. I used to LOVE it when she made her pot roast with tender roast veggies :) So comforting and warming. 


Recipe (serves 4-5): 
3-4 whole Carrots, chopped (or about 2 cups baby carrots)
1 medium white, yellow, or brown Onion, chopped
2-3 cups Baby Potatoes, or chopped Russet Potatoes
2-3 stalks Celery, chopped
3 lbs Beef (any "chuck" or "round" cut)
1 envelope of Dry Onion Soup mix
1 cup Boiling Water
1 cup Red Wine

*optional for Gravy: 1 Tbsp Butter, 1 Tbsp flour


Place all chopped veggies in bottom of slow cooker. 

Lay meat on top of veggies. 
Mix dry soup mix into 1 cup boiling water, pour over meat along with 1 cup red wine. 

*Just like with Beef Bourguignon, tougher (less fatty) cuts of meat are cheaper, healthier, and PERFECT for long, slow cooking. As the meat cooks for hours in the liquid, the tough collagen is converted to a gelatin and the meat becomes tender and soft. 
Don't waste your money on expensive fatty cuts of beef; opt for 'chuck roasts' or 'round roasts'. If you have any questions, ask the butcher in the supermarket- they are super friendly. 

Fit lid on top, and turn on low for 8 hrs (or high for 4 hours)

When you are ready to eat, whip up a quick gravy to go with it and everyone will think that you spent all day in the kitchen making this roast. 

Start the gravy by making a roux: Using equal parts butter and flour, melt one Tablespoon or so of butter in a pan, add 1 Tablespoon or so of flour; Cook for no more than a minute, whisking constantly: 

Add liquid from the crock pot (about 2-3 cups). Let simmer, whisking frequently: 
(no need to season it, all of the juices from the pot are seasoned and flavorful already)

When the gravy has thickened to your liking (don't forget, it will thicken even more after it has been removed from the heat, so it's probably done after about 5 minutes- don't sit forever waiting for it to thicken)

Plate the roast and veggies...
(look at that TENDER meat falling apart!)

 and pour gravy over the top...
VOILA!!! It's almost like a shortcut for beef bourguignon!

OPTIONAL: If you want to get a little extra special, just invest a couple minutes on the meat before it goes in the crock pot:
  • Sear the outside of the meat on all sides until dark brown.
  • Then continue all other steps exactly the same, and use that searing pan again later when you make the gravy to get all the extra yummy browned bits into your gravy :)

Friday, April 22, 2011

Island BBQ Kabobs


Last weekend we had more BEAUTIFUL beach weather. Peter and I went for our Saturday morning walk, then we took a cruise down the coast to get Peter a new pair of sandals at the Rainbow Sandals factory in San Clemente. On our drive back home, we called a bunch of friends to meet us at the beach and join us for a BBQ afterwards. So far, it had been a perfect 'summer' day... and it was only going to get better. I had been dying to try a new marinade, so on the way home we picked up a couple pounds of meat from the deli, whipped up a quick marinade, and let the meat marinate while we were at the beach. When we came home it was only 20 minutes to cook the rice and grill the kabobs and we were eating dinner in no time!


Island Kabobs: 
  • approximately 2 lbs Beef, cut into 1 inch cubes
  • Island Marinade (see below)
  • 1 Red Onion, cut into large chunks then separate layers
  • 1 can pineapple rings, cut into quarters (reserve juice for marinade and side rice)
  • 8 long, metal skewers


Island Marinade: 

  • Zest of 1 Lime
  • 2 Tablespoons Lime Juice
  • 1/2 cup Pineapple juice
  • 1/2 cup Soy Sauce
  • 1/4 cup Honey
  • 1/4 cup minced Garlic
  • 1 Tablespoon Cayenne Pepper
  • 1 1/2 Tablespoons Dijon Mustard
  • 2 Tablespoons Corn Starch


Combine all marinade ingredients, except corn starch, in a bowl big enough that will later fit all the meat as well. Then reserve 1/2 cup of the marinade out of the bowl to use for basting the kabobs while on the bbq. 
Whisk 2 Tablespoons of corn starch into this 1/2 reserve marinade- this will thicken into somewhat of a glaze as we paint it onto the meat over the bbq. 
Stir all your meat into the marinade, cover with plastic wrap, and let marinate for 1 hour or more... while you're enjoying the beach :) 
**The longer the meat marinates, the better it is because the acidic juices will tenderize the meat more with time. 

Assemble kabobs by skewering the ingredients, alternating between the onion slices, meat, and pineapple quarters. Discard the marinade that remains in the bowl. Heat bbq to medium high. (while grill is heating, start the Island Rice side dish. This way, the rice and kabobs will be done at the same time!) When the BBQ is hot, place the kabobs right onto the grill.


If you haven't done so yet, whisk 2 tablespoons of corn starch into the 1/2 cup reserved marinade. After the kabobs have grilled on one side for about 7 minutes or so, flip them and brush them with the marinade glaze. 

Proceed to cook the kabobs on the second side for another 7 minutes, basting continually with the marinade glaze. Serve these delicious island kabobs over a bed of island-style rice!

It was so fun to set the table outside, bring out some music, and enjoy this pseudo-summer weather while dining outdoors with our friends!

Friday, March 11, 2011

Beef Bourguignon


Boeuf Bourguignon was made well known in America by the famous Julia Child. It is a comforting, warm, meaty stew whose French name translates in English to "Beef Burgundy", but is most commonly known as 'Beef Bourguignon' (half English, half French). As the name hints, the beef braises in red wine (the 'burgundy' from the Burgundy region of France) over an extended period of time. This cooking method tenderizes the meat so much that it is possible to use a very cheap, tough cut of meat that would otherwise be undesirable. Because this beef stew worked so well with cheaper cuts of meat, it was classically the "poor man's" stew in France. Now it is just a great hearty meal; perfect for a chilly day when you want to come home and make the house smell warm and yummy and fill your tummy!


Shopping List (for 3 servings)

  • 1 lb raw Beef, cut into 1 inch cubes
  • 1/2 large Yellow Onion, roughly sliced (or a large handful of pearl onions)
  • 3 large Carrots, sliced into medallions
  • 3 small Potatoes, cubed (or mushrooms)
  • 1 teaspoon of minced Garlic
  • 2 cups Beef Broth
  • 1 cup Red Wine
  • 1 can Green Beans, drained (or peas)
  • 2 Tablespoons Corn Starch
  • Seasonings of your choice: I just used black pepper and a couple sprigs of fresh thyme, and it was very flavorful, but you can add any seasonings you like; some other traditional bourguignon herbs are parsley and bay leaves.

(no added salt necessary as beef broth is already salty)


Typically, beef bourguignon starts by browning bacon and then sauteing the beef cubes in the rendered bacon fat. However, I have (obviously) skipped the bacon fat step. Instead, start by heating a tablespoon or so of oil in a wide dutch oven. When it is very hot (almost smoking), add your cubes of beef, and brown on all sides.
**Note, your oil needs to be very hot before you add the meat so that you can sear and brown the outsides and keep moisture inside that will cook tenderly as it braises in the stew later.

Add the beef broth, wine, minced garlic, and herbs/seasonings. Stir well. 
Bring to a boil, place lid tightly on pan, then turn heat to LOW. 
Let it simmer, covered and over LOW heat for 1 hour:

After 1 hour, you will have a thick, rich, flavorful base for your stew. Add your carrots, onions, and potatoes at this time:


Cover again, and continue to simmer for another 30 minutes or so (until your veggies are tender):

After your root veggies have simmered and softened, add the green beans for about 5 minutes (until they are heated through):

Mix corn starch into 2 tablespoons of water and whisk into a clearing of the stew broth. Carefully stir stew all together and let it simmer for about 5 minutes so that the broth may thicken a bit.

Beautiful! And it smells SO good too!

Serve with warm crusty bread

...and ENJOY this filling, tender, warming GOODNESS!

Alterations: You can use... 
  • Pearl onions instead of sliced onions
  • Peas instead of green beans
  • Mushrooms as an additional veggie
  • Whatever else you like! -Comment below to share your ideas :)

Sunday, January 23, 2011

The Perfect Porterhouse Steak


This Friday night we had a fun date night IN. Instead of going out for a fancy dinner and a show, we decided to stay in for a fancy dinner and show. I got a big, beautiful Porterhouse steak at the supermarket and decided that THAT would be the perfect dish for a date night. It is perfect for a date night because it is way too big in size and thickness for one serving alone, so it is a great one to share. It is also great for a date night because it happens to inherently include 2 distinct steaks already, so it is a perfect dinner for two! The Porterhouse has a T-shaped bone which divides the 2 distinct steaks: the larger top loin (or NY strip steak), and the smaller tenderloin (or filet mignon). Though the Porterhouse cut does have the T-shaped bone, it is NOT the same as a T-bone steak. However, they are similar in that they are both cut from the same place (the short loin), but the Porterhouse is cut thicker and is cut from an end of the short loin which allows it to include a larger portion of the tenderloin (or filet mignon) than the T-bone. Thus, we get TWO great steaks for less than the cost of ordering one if we went out to a fancy steak house! If you look at one of the pictures in this post, can you identify the larger top loin (NY strip streak) and the smaller tenderloin (filet mignon)?


Cooking the Porterhouse is really easy... there's no real recipe or ingredient list to follow. Instead, cooking a great steak is all about how you do it rather than what goes into it. I like to to do a 'sear-and-bake' method, however, I think BBQ-ing is another great way to go. But because the BBQ is Peter's forte and definitely not mine, I stick to my comfort zone; the kitchen. 


Tips and Techniques:


I think it makes a big difference to have your meat at about room temperature before you start. I will explain this theory shortly.


The first thing you are going to do is season it very lightly with Lawry's seasoning salt or Montreal steak seasoning. I don't like to use too much seasoning; I think too much can take away from the delicious tender meat flavor that you are paying for in a nice cut of meat. Just use your hands and rub a little of your seasoning into each side of your steak. 


After you have rubbed in your seasoning of choice, preheat the oven to 350 degrees F, and melt a tablespoon of butter in an oven safe saute pan over medium heat.  It should be hot enough so that the steak will hiss and sizzle a bit when it first goes in (you can test this by running your hand under the kitchen faucet and flicking a little water from your fingertips, this will make the pan sizzle if it is ready). When the butter is melted and hot, lay the steak on one side and leave it there for a good minute or so. 


Disclaimer: the following theories are based on a collection of things I've heard, so it could be totally bogus, but I think it is logical and, based on my experiences, it seems to work! I swear by these techniques when I cook steak in my own kitchen. So, I recommend you give it a try as well:

Don't flip it back and forth, because you want to create a nice sear to lock in all the juices and let it start to cook into the inside of the steak just a little. If you keep flipping it back and forth, you will only get a grey-brown outside instead of a nice crusty golden brown sear. Also, the heat wont get to travel beyond the outside if you keep flipping it; Let it sear on each side and leave it there so that it can start the process of cooking into the steak. This is also why you want it at room temperature. If the steak is cold, it awill slow down the heat, and you will have to cook it longer which will make the meat less tender and more rubbery.

Once it gets a light and crusty brown sear to the underside of your steak, flip it and let the other side get a nice brown coat. 

When the second side has seared and browned, pop the whole pan into a preheated 350 degree F oven. 

I recommend 8-10 minutes in the oven for a medium doneness. This yields a steak that is golden brown with a light pink middle. However, if you are one who prefers your steak on the less-done side, you might want to try 5-8 minutes. If you prefer your steak well done, try 10-14 minutes in the oven. 
I like my steak just medium, because I think it is most tender, juicy, and meaty this way, without any raw hot pink or bright red meat and juices. So, this one I cooked just to medium, or about 8 minutes: 

I also served mine with lightly steamed, seasoned green beans
and... cauliflower mashed 'potatoes'. (cauliflower recipe post to follow).

And for our night-in, instead of going out for a show,(okay, so technically we went 'out') we enjoyed this show from a view point in our area that is literally called 'Top of the World'. For about 20 minutes we watched the ocean and sky change brilliant colors as the sun set behind Catalina Island on the horizon.