Showing posts with label Healthier Makeover. Show all posts

Saturday, July 21, 2012

Chicken Salad Veronique


I don't know where the name came from, but that's what my mom always called it when we were growing up, so that's what I'm going to call it. 
It is pronounced 'vair-oh-neek', but Peter looks at the name and calls it "chicken salad very unique". Haha! That makes me smile :)

Whatever you choose to call it, this is a great seasonal, summer salad. So seasonal in fact, that the ingredients showed up in a cardboard box on my doorstep this morning. I subscribed to a farm fresh produce box delivery, and this was my first delivery! It is so exciting when the box shows up! It's like Christmas morning... I have no idea what's inside and I just get to rip it open and dig through to find which fresh fruits and veggies were harvested this week :) As I dug through the box, I started registering all the ingredients in my head like puzzle pieces, so that I could play with them in my mind throughout the day to figure out what I could make for dinner.


After I had my fun with the produce box, I went for a run. Though it was only 8:30  in the morning, it was already so sunny and HOT! Days like these remind me of my dad when I was a kid; he would always ask my mom to make 'chicken salad veronique' whenever it was a hot summer day. That's when it clicked for me this morning- I had most of the ingredients in my produce box already! My puzzle pieces were all put together and dinner was solved :)


This salad is cool and refreshing with its lemony dressing and juicy grapes, yet crunchy and hearty with the slivered almonds and the crisp celery.


The recipe below isn't the exact original, I altered it a bit to fit what I already had in my kitchen and to fit what I like. I get asked a lot how I come up with my recipes... this is usually how they start;  just swapping for healthier ingredients, what I have on hand in my kitchen already, and adding other flavors I think would be good complements to the dish. A lot of times I also research about a billion-gajillion other recipes and take bits and pieces that I like and put them together to come up with my own version. At the end of this post, I will outline some of the differences that I made to this original recipe in case you would like to play around with it for your own preferences as well. It's a very adaptable recipe, so feel free to experiment with some of your own changes too!


Ingredients (4 small servings):


  • 2-3 cups Chicken, cooked, cubed, & cooled (about 4-5 chicken breasts)
  • 1 cup seedless Grapes, halved
  • 1 cup Celery, sliced (about 4 stalks)
  • 1/2 cup Almonds, sliced or slivered
  • 1/3 cup Craisins
  • 1/2 cup Nonfat Greek Yogurt
  • 1/4 cup Low Fat Mayo
  • 1 teaspoon White Wine Vinegar
  • 2 teaspoons Honey
  • 1/4 cup Lemon Juice (about 2 large, or 3 small lemons)
  • 1/8 teaspoon Ground Mustard Powder
  • 1/8 teaspoon Curry Powder


You want to cook your chicken first so that it has time to cool before you assemble your salad (or use cooled leftover chicken).
*Helpful Tip: If you are cooking chicken breast for dinner earlier in the week, just cook some extra and set it aside for this salad for another day's lunch or dinner.*


Prepare the grapes and celery that you need to chop for the salad. And get the rest of the ingredients ready.


In a large bowl, combine the yogurt, LF mayo, vinegar, honey, lemon juice, ground mustard, and curry. This is your hearty dressing for the salad.


Now, just simply add all your prepared chicken, grapes, celery, almonds, and craisins to the dressing in the bowl and stir to coat. It is ready to eat right away or it is perfectly happy sitting in the fridge until you are ready to eat.


Isn't it pretty plated on a bed or ruffly red leaf lettuce :) 
I also garnished it with a little celery leaf and a few craisins for some bright polka dots of color. I always like to garnish with something that actually hints at the flavors that are within the dish. You could also garnish with a little lemon zest too! That could be fun :)


This recipe is great for brunches, for women's teas, wedding showers, for making ahead when you won't have much time later to prepare dinner, or just for those hot summer days :)


Free free to alter and swap ingredients as you please... this is a very 'swapppable' recipe :)
Also, here are the swaps I made from from the original recipe that I told you I would outline to give you some other ideas:
  • Instead of the lemon yogurt that the original recipe calls for, I substituted in real fresh lemon juice and fat free greek yogurt sweetened with a little natural honey
  • Instead of a lemon-lime alcohol bitter, I used a splash of white wine vinegar to get that same bite in the flavor. 
  • It also calls for some diced raw onion, that I omitted completely
  • I used low fat mayo instead of regular
  • I added the craisins- there's no swap here, just added it 'cuz I felt like it, plus I thought it would be nice to add just for the punch of color contrast. 
  • ...Same with the curry. No sub. Just added it entirely. The flavor works VERY well in this dish.
  • It called for deli mustart, but I just used a bit of ground mustard instead
  • I didn't do this, but you could add a little lemon zest into your salad if you really like that fresh lemon flavor, or you can just sprinkle a little zest on top for garnish. 

Wednesday, October 19, 2011

Creamy Chicken Enchiladas


This is a quick and easy version of chicken enchiladas that packs a lot of flavor punch. I've seen recipes for 'creamy chicken enchiladas' that use either cream cheese or sour cream in the filling. To lower the calories and fat, I used nonfat plain greek yogurt instead of the other creamy ingredients that are higher in calories and fat. You still get all the cool, creamy refreshing flavor of the sour cream, but without the calories and fat. 
The nonfat, plain greek yogurt is one item that seems to always be on my grocery list nowadays. It substitutes SO WELL in place of sour cream in any recipe... it's unreal.

This recipe was a weeknight inspiration when I got home late from work and needed to whip up a quick dinner... before heading out again to see our new baby nephew that had just been born! Usually when these rushed evenings happen, I get a flood of 'oh crud' feelings and my adrenaline pumps, but some of my most creative and successful recipes come from those moments on the fly. On this particular night, I opened the fridge and saw a big bundle of cilantro. "That's it" I thought, "I'm going to use that cilantro and I'm going to use the greek yogurt to make quick, creamy, healthy mexican enchiladas". The rest of the ingredients I needed to make the enchiladas are just staples that I almost always have on hand (so you likely will too). It was a no brainer; boil the chicken. assemble enchiladas. bake. done. out the door. We even got to pack some up and take it to the hospital to share with the new parents!

Ingredients (makes one 9x13 casserole dish):
  • 3 cups cooked Chicken, shredded or cubed
  • 12 oz. plain, nonfat Greek Yogurt 
  • 1/2 cup chopped Cilantro
  • One 4-oz. can of diced Ortega Chiles, drained
  • 2 cups shredded Cheese, divided (I used a 4 cheese mexican blend, but you can use mozzarella, pepperjack, anything you like)
  • 1/2 cup diced Tomato, (or 1/4 cup Salsa)
  • 8 medium sized Flour Tortillas, OR 10 small Corn Tortillas
  • One 28-oz. can of Green Enchilada Sauce


Mix your 3 cups chicken, 12 oz. yogurt, 1/2 cup cilantro, ortega chiles, 1 cup cheese, and 1/2 cup tomatoes all together in a bowl.


In the bottom of your 9x13 baking dish, spread 1 large spoonful of the green sauce. This will keep the tortillas from baking onto to the dish.


Warm tortillas by wrapping them in a damp paper towel and steaming them in the microwave for a few minutes. This will make them pliable, so that they won't crack when you try to roll them up.


Stuff the warmed tortillas with as much of the creamy chicken filling mix as you can inside each tortilla. 

Roll them up and place seam side down in your sauced baking dish.


Once all your tortillas are rolled and nestled into the baking dish, pour the remainder of the green sauce over your little enchilada rolls.


Top with the other cup of shredded cheese (or more if you like) and bake, uncovered, at 350 degrees F for about 30 minutes, or until heated through and cheese is golden brown and bubbly on top. 


You can add or omit any ingredients you please. You really can't mess these up. It can even be as simple as just a little cheese and the chicken inside the tortillas and it will still be delicious and filling! Cover anything with sauce and cheese and you can't go wrong :)

Monday, October 10, 2011

Apple Dumplings

These are SO cute and so fun :) I have the original recipe for these from the Apple Farm Hotel and Restaurant. I've spoken about The Apple Farm in previous posts, but it is a special, quaint hotel/bakery/restaurant/gift shop in the small town of San Luis Obispo, where Peter and I went to college. They have the BEST bakery. 
Anyway, these apple dumplings are so fun the make, fun looking, and fun to eat!! They are like little apple pie bombs! I even used the same cute little leaf cutouts that I used on top of my apple pie to make these apple dumplings look like actual apples! Fun and festive looking, huh :)


Recipe: 
1 batch of Pie Dough
4 small Apples
enough Brown Sugar to fill core of apples
a dash of Cinnamon to top each apple
a dot of Butter to top each apple (OPTIONAL)


First, make your pie dough. While that rests in the refrigerator, tend to your apples:
Peel and core, OR peel, core & slice each apple. Again, I used my handy dandy apple peeler/corer/slicer):

When your apples are ready, divide your dough into 4 equal portions, and roll out each until about 1/4 inch thick or less: 

Place an apple into the middle of each round of rolled dough. 
Fill the core of the apple with brown sugar, and sprinkle the top with cinnamon:

*OPTIONAL: Put a pat of butter to plug up the top of the core. I did this on some and didn't do it on the others. Your choice...

Wrap up the apple to the best of your ability, trimming away excess dough & making sure that seams are sealed tightly. Use excess scraps of dough to make stems and leaves:

Bake at 400 degrees Fahrenheit for 20-25 minutes
As it bakes, the apple cooks slightly and the sugar mixture melts down and oozes through all the apple slices:

Yummy, Yummy, Yummy! The only thing these apple dumplings are missing, is....
 a big scoop of ice cream!


Enjoy this fun & festive dessert!

Wednesday, October 5, 2011

Classic Apple Pie


In my last post, I talked about how Peter and I went apple picking at Oak Glen with our friends Trevor and Laurie. It was awesome! The farms offer apple cider tasting, and they let you apple taste before you decide which type of apple you want to go get. The people there were SUPER friendly and helpful too; they taught me about ALL the different varieties of apples as I tasted each one. Tasting all of them at once really allowed me to tell which ones were sweet, firm, tart, strong, mushy, mild etc. 

My goal was to find out which was the best baking apple to make an apple pie. I will share with you what I learned; for baking, you want...
  1. strong 'apple-y' tasting apple rather than a sweet or mild tasting one. (that's literally the way they described the flavor to us, haha)...because, baking innately makes the flavor to become more mild, so if you started with an already mild flavored apple, your pie would definitely lack it's full flavor potential. 
  2. a tart apple rather than a super sweet one...because you want the sweet and tart balance in a fruit pie. If the apple is super sweet, like say a honeycrisp (which seems to be the crowd pleaser of eating apples), and then you add sugar to make it into a pie, it will be sickly sweet. 
  3. a firm crispy apple rather than a soft one...because, once cooked, the apples soften and the ones that already started off soft then bake to become too apple-saucey. 


In the end, the farmers helped us narrow it down to 2 different varieties: 'Spartan' apples and 'Pippin' apples. Both for their STRONG apple-y flavor, and for their firmness. Somehow we also got talked into 
buying like 20 lbs of apples! Laurie and I came home and got straight to work :)
(The red colorful ones are the Spartans, and the green ones are the Pippins)

Recipe: (makes one pie):
  • You can't really go wrong with an apple pie, so you don't really need a recipe. In fact, I didn't even measure the ingredients that I put into my pie filling. Just use these measurements as a general guide, but you can just eye-ball it to put as much or as little of each as you desire and as your apples call for. For example, sweeter apples need less sugar; some people don't like cinnamon or like more cinnamon; some apples are so tart that no lemon is necessary; etc.
  • 1 batch of Pie Dough
  • 12 medium Apples
  • 2 Tablespoons Lemon Juice
  • 2 Tablespoons AP Flour
  • 1/4 cup Sugar
  • 1 generous teaspoon Cinnamon
  • I didn't do this, but traditionally you slice a few Tablespoons of butter over the top of the apples if you would like to do it that way. 


Start by baking your pie dough. Then get your apple filling ready while the dough is refrigerating:


Peel, core, and slice your apples. 

Then toss with about 2 Tbsps flour, 2 Tbsps lemon juice, 1/4 to 1/3 cup sugar (depending on how sweet you want your pie and how sweet or tart the apples already are), and lastly a generous teaspoon of cinnamon. Toss together in a large bowl using your hands. (If your bowl is not big enough, just divide it into 2 batches :)


Fill your chilled pie shell with your apple mix. Firmly press all the apples into the shell and make it as compact as possible:
(This is when you would sprinkle a few tablespoons of cold, diced butter over the top of the apples before you put the crust over it all. I didn't do this, but you are certainly welcome to partake in the tradition.)

Drape the top-crust dough over your pie. Again, press down as you lift the edges to release air pockets. As the pie bakes, the fruit shrinks, and you don't want an air gap between the apples and the crust:
Trim off the extra dough while still leaving a 1 inch overhang. Tuck that 1 inch of dough around the pie underneath the edges and press tightly to seal all the way around. 

With a knife, cut a couple slits into the top crust so that hot air can release while baking. Sprinkle the top of the pie with a little extra sugar:


The pie crust edges cook and brown very quickly, so protect it with a pie shield or foil for the first 20 minutes of baking:


Bake at 400 degrees Fahrenheit for 20 minutes with crust edges protected, then remove foil or shield, and bake for an additional 15-20 minutes: 

Let the pie cool when it comes out of the oven. If you try to cut it and serve it right away, the filling will run out of the pie and fill the pie dish. Let it sit to cool and congeal before cutting.


Look at all those lovely layers of tasty cinnamony-sugary apples!

They're hard to see in the pictures above, but you can find the cute little cutouts that I have on the top of my pie at Williams-Sonoma. 

Wednesday, September 28, 2011

A+ Crust Recipe


This crust can be used for main dishes OR desserts; once you get a good crust recipe, you can use it for everything... fruit pie, pot pie, quiche, anything


In dishes which require a crust, it is the crust itself that can make or break the dish. However, the crust can be the most unhealthy part of those yummy dishes. A traditional crust is made with either butter, lard, shortening, or any combination thereof. 
But this crust recipe (though not a 'health' food) is much healthier than a traditional crust because it uses canola oil and nonfat milk instead. Plus, it is just as golden, flakey, and flavorful! 


I am sharing this recipe in time for all of your fall baking in hopes to help ease some of the calorie load that comes with the holiday season. 


Over the weekend, Peter and I went apple picking with our friends, Trevor and Laurie. Somehow we came home with A LOT more apples then expected, so Laurie and I turned my kitchen into an apple pie factory on Sunday afternoon. We were cranking out loads of pie dough and peeled apples. This recipe earned an A+ across the board from all the taste testers... and no one knew that there was not even a dot of butter in the crust nor in the pie filling! For this reason, this crust earns in A+ from the 'taste' category AND for the 'healthy makeover' category! What a fun way to enter another season of fall baking!

Recipe (for one 'double crust' pie, or two bottom crust shells):
  •  2 1/3 cups AP Flour
  • 1 tsp Salt
  • 2/3 cup Canola Oil
  • 6 Tablespoons cold, nonfat Milk

Mix together the flour and salt, then add in the oil, then the cold milk:

Continue until combined and it starts to clump and stick together. Try not to overmix. 
When it is ready, a portion of the dough should stick together almost like play-dough (but slightly stiffer) when squeezed in hand.
If it isn't quite moist enough, 
add a little more oil until it gets to the right pie dough consistency. Do NOT add extra milk. 

Divide dough into 2 equal portions. 
Roll out the first half of the dough between 2 sheets of wax paper:
(Because this dough is made with oil, it is easiest to roll it between 2 sheets of wax paper. Even with my handy dandy nonstick roller, this dough tends to stick and pull apart when I tried rolling it out without wax paper. So I really encourage you to use the wax paper method.) 

After you roll out the first half of the dough, transfer it to your pie pan. Leaving 1 inch of extra dough around the perimeter, trim excess dough and use your fingers to roll the 1 inch border under the edges to create the thick crust edge.

Cover with plastic wrap and refrigerate while you make your crust filling.

Repeat with the next half of dough if you are making quiches or single crust pies.
OR wrap the second half with plastic wrap and refrigerate the second half before rolling out the top crust of your double crust pie...
OR wrap with plastic wrap and refrigerate to save for later baking.

Now you have options again: 
  1. If your recipe requires a pre-baked pie shell: remove pie pan with uncooked crust shell from refrigerator and bake for 13-15 minutes at 450 degrees F. Then fill with pie filling and continue to bake according to that recipe's instructions. 
  2. If you are making a single crust pie: remove crust shell from refrigerator, and do NOT prebake pie shell unless your recipe calls for it. Fill with pie filling, top with crumble topping (or whatever topping you are using instead of the top crust) and bake according to pie instructions. 
  3. If you are making a double crust pie: Remove second half of refrigerated dough and roll out to make top crust. Remove crust shell from refrigerator, fill with desired pie filling, cover with top crust, and bake according to recipe instructions. 
We made a double crust apple pie. Boy was it DELICIOUS! Look at that golden, flakey, crust and all those layers of apples! Thank you Laurie for peeling all the apples!

*Apple Pie Recipe to follow

Tuesday, September 6, 2011

Apple & Maple Glazed Pork Chops


It seems like everyone is always looking for a new way to serve chicken for dinner. This time, I just decided to try something altogether new instead of chicken. Though it isn't the official slogan anymore, pork is still 'the other white meat'. When using fatty cuts and poor cooking methods, pork can be unhealthy, but if you start with a lean cut and use healthy seasoning & cooking methods, pork can also be a great, healthy, lean protein. I tried making a few different versions of these pork chops, but this one was finally the one that Peter and I voted as the winner to share with you. 

Recipe (serves 2, but easily multiplies to serve 4,6,8,etc):
  • 1/2 large apple, diced
  • 1 tsp Butter
  • 2 Tablespoons chopped Walnuts
  • 3 Tablespoons Maple Syrup
  • 2 teaspoons Cider Vinegar
  • 1/4 teaspoon fresh Lemon Zest
  • 1/4 cup fat free, low sodium Chicken Broth
  • 2 Pork Chops, approximately 1 1/2  inches thick
  • 1 Tablespoon Canola Oil
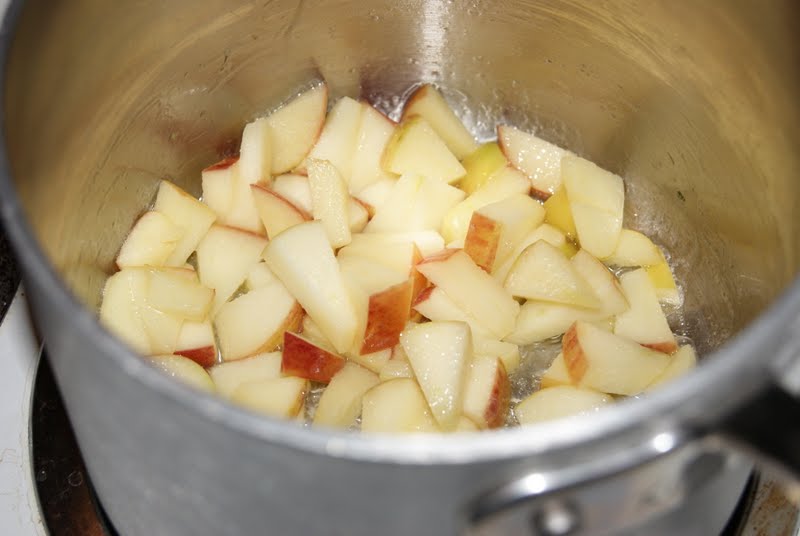
Start by heating 1 tsp butter in a sauce pot and add the diced apple:
 Saute the apples over medium heat for about 10 minutes:


Then reduce heat to low, add 2 Tbsps of chopped walnuts, 3 Tbsps maple syrup, 2 tsps cider vinegar, and 1/4 tsp lemon zest. Stir and simmer for about 2 minutes then stir in 1/4 cup chicken broth and let it all simmer for a few minutes until it thickens slightly. 

Pat pork chops dry and season both sides with any seasoning blend (I used a salt free seasoning). Heat 1 Tbsp canola oil in your pan, and sear the pork chops for about 3 minutes on each side to allow a nice golden crust to form:

Top with the apple-maple glaze...

...cover, and bake in a 350 degree F oven for about 20 minutes. (cooking time will vary depending on thickness of your pork chops- mine were about 1 1/4 inches in thickness)
I think covering your pork chops are important to keep your meat tender and protect it from drying out.

 Serve your beautiful pork chops with a side of wild rice and a mixed green salad tossed with some of the same ingredients as those in your glaze to tie the flavors together. 

I diced the other half of my apple to toss in the salad along with feta cheese, dried cranberries, candied walnuts, and a drizzle of balsamic vinegar.

Look at how tender and juicy the pork chops are inside 
and how warming and yummy that glaze is!