Showing posts with label Bread. Show all posts

Saturday, October 22, 2011

Banana Pecan-Streusel Bread Pudding with Butter-Rum Sauce


Oh my goodness, what a mouthful of a name! Maybe I should have posted the rum sauce separately? It is definitely good enough to be a stand alone glaze; it would be good on ice cream alone, on poached fruit, or even cinnamon rolls... hmmm :)
One of my favorite restaurants is "K'ya" in Laguna Beach. They serve fun small plates so you can try several dishes from their dynamic menu. One of my favorite dishes is their Lobster Truffle Risotto... I will have to play around in my kitchen and figure out how to copy it so that I can share it with you.
However, K'ya also has one of my all time favorite desserts: Banana Pecan Bread Pudding. I LOVE bread pudding, but the first time I ate at K'ya, I didn't order it because I was bummed about the banana pecan part- HA! How foolish I was... when I finally tried it, a few visits later, I couldn't believe I had ever turned it down. They used to serve it with a rum sauce, but now they sometimes serve it with a different one.
I may not have figured out the risotto yet, but the bread pudding I have most definitely come up with a great way to recreate at home and I am excited to share it with you :) We even kicked it up a notch with a pecan-streusel topping! ('we' because that was actually Peter's idea!)


Whenever we go away on vacation or even just a weekend, it has become a tradition that I make banana bread when we return home. It's too perfect, buy bananas before you leave; come home and they are nice and over-ripe for making banana bread!


Last weekend, Peter and I went to visit San Luis Obispo...
(*side note: we stayed with our friends Matt & Alexa, and I must share her awesome etsy site with you! I love her beachy chic style!)
Anyway, when Peter and I got home from SLO, I made banana bread, of course. We enjoyed some toasty banana bread with breakfast the next morning. However, on our way home from work that night, Peter asked if I could try to recreate the K'ya banana bread pudding. We got overly excited and Peter got carried away with ideas of a crunchy top, and ice cream, and... I just LOVED the excuse to play in my kitchen! When we got home, I did some quick research and went to work :)


The nutty crunch on top complemented the dense, moist, sweetness inside. And the rum sauce...ooooh, it just made it all gooey and warm, and added yet another layer of flavor! One thing's for sure; this is a RICH dessert. We enjoyed ours with a side of vanilla ice cream and a tall glass of milk :)


Recipe: (for 2 large inidividual ramekin servings)


Bread Pudding:
  • 8 oz (1 cup) fat free evaporated milk
  • 2 eggs
  • 1/8 cup granulated white sugar
  • ½ Tbsp Vanilla
  • ¼ tsp cinnamon
  • 4 thick slices of banana bread (about ¼ loaf banana bread), cubed and toasted or stale
Pecan Streusel Topping:
  • 1/2 Tablespoon Butter
  • 2 Tablespoons Dark Brown Sugar, packed
  • 1 Tablespoon AP Flour
  • a few dashes Cinnamon
  • 1/4 cup Pecans, halved or chopped
Butter-Rum Sauce: (makes more than you need for bread pudding, but you can store the rest for another use, or cut the recipe in half)
  • 2 Tablespoons Butter
  • 1/3 cup white granulated Sugar
  • 1 Tablespoon Corn Starch
  • 1 cup Fat Free Milk
  • 3 Tablespoons Rum


First make the bread pudding custard mixture by mixing together the evaporated milk, eggs, sugar, vanilla, and cinnamon. 

Make sure your bread cubes are toasted: 

Then soak the toasted bread cubes in custard mixture: 

Transfer to buttered or sprayed ramekins. Place ramekins on a baking sheet or jelly roll pan to catch drippings.
Preheat oven to 350 degrees F. Do NOT put the bread pudding in the oven yet. Instead, let the bread soak in the ramekins while the oven is preheating and while you mix the pecan streusel topping....

Streusel topping:
Melt ½ tablespoon of butter in a bowl, add 2 Tbsp packed dark brown sugar, 1 Tbsp AP flour,  a few dashes of cinnamon, and ¼ cup chopped pecans. Stir together well.
Cover top of bread-filled ramekins with pecan streusel topping:

Bake at 350 for 30 minutes. Allow to cool for about 10 minutes. While bread pudding is cooling, start the rum sauce…

Butter Rum Sauce:
in a small saucepan, melt 2 Tbsp butter over medium heat. Add 1/3 cup sugar and 1 Tbsp corn starch together into the butter at the same time. 

Stir immediately until well mixed. –the result will look somewhat like a salt scrub

Let it cook, stirring, for about 30 seconds
Add 1 cup milk, stir well until all is dissolved together (15 seconds)

Increase heat to medium-high, and stir frequently as it starts to thicken and comes to a boil. (about 3 minutes)
It will boil and froth and increase in volume. Continue to stir. 

The sauce will eventually decrease in volume again as you stir, and it will become a slightly-thick liquid glaze consistency. (another 3 minutes)
Remove from heat and stir in 3 Tbsp rum. Let it sit for a few minutes, it will continue to thicken as it cools.

If you don’t allow both the sauce and the bread pudding to sit and cool for about 5-10 minutes, then the hot sauce will just run and melt right off of the steaming bread pudding right away.
Didn't wait long enough here...

...so I waited for it to cool a little more, and then it was perfect:

Pour rum sauce over slightly cooled bread pudding. Serve with a side of vanilla ice cream and a glass of cold milk. ENJOY!

LOOK at that ooey-gooey middle with the sweet crunchy top...

...and that sauce just tantalizingly dripping down!

Monday, September 19, 2011

Sweet Cornbread


OH MY GOODNESS! This is my favorite cornbread I've ever had! I always made boxed cornbread, but I have really, really, really been wanting to try making it from scratch. However, I have pretty high demands for cornbread; it has to be sweet, moist, it can't fall apart into dry crumbles in my hand, and it absolutely must have actual bits of corn IN it. I figured I'd have to make it a few times before I could piece together a recipe that I would approve of, but this time I got so lucky! This is my first scratch recipe of cornbread and it hit ALL the points on my checklist, and it exceeded my expectations for taste. I could eat the entire dish by myself! It tasted  kind of like that sweet corn cake that is commonly served with mexican food, but in bread form. This cornbread tastes as if that moist & buttery corn cake married sweet & soft corn bread. 


We've kind of had a couple cooler days down here in Laguna that already feel like the beginning of Fall. That always gets me so excited for cozy nights and fall baking! So I jumped on the opportunity to made a big pot of my sweet chili when Peter said that this cooler weather made him feel like chili and cornbread. This was also my big opportunity to try cornbread from scratch. If you're into sweet, moist, flavorful, perfect cornbread... this is something you might be interested in  (hehe, okay- maybe I'm biased :)


Recipe (one 8x8 baking dish): 
1 cup Flour
1 cup Cornmeal
1/2 cup Sugar
1/2 teaspoon Baking Powder
1/2 teaspoon Baking Soda
1/2 teaspoon Salt
1/2 stick Butter, melted
1/4 cup Milk (sometimes I'll use Fat Free Half & Half if I have it around -not like this is a healthy recipe or anything, but anytime you can swap in healthier ingredients- even the smallest choices- make a positive difference :) lots of small changes add up to make a big change.)
1 large Egg
1 can Cream Style Corn


Preheat the oven to 400 degrees F. Mix the 6 dry ingredients in one bowl, and the four wet ingredients in another bowl. 
Dry Ingredients:
Wet Ingredients:

After your dry and wet ingredients are each mixed well, add the dry mix into the wet bowl just until combined. Do not over mix (supposedly overmixing can result in tough, dry, hardened bread). 

Pour Batter into a buttered or well oiled 8x8 baking dish: 

Bake at 400 degrees F for about 30 minutes. 

Enjoy with some meaty, sweet 'n spicy chili:

 Just look at how moist it is, and with those sweet little juicy bits of corn in it too! Mmm!

You can even make this recipe into corn muffins if you would like, but lessen the cooking time to about 18 minutes.

Friday, August 5, 2011

Oatmeal Bread


I grew up babysitting for the Dean family. The 4 kids were like my little siblings that I never had but always wanted; and Todd & Becky were like another set of parents to me :) I still consider them 'family'. Becky and I were hiking in Laguna Beach a few months back, and we were talking about recipes and baking bread and so on. Soon after, she told me about this wonderful oatmeal bread that was one of her family's recipes. It is sweet and wholesome tasting at the same time. The oats give it that light, nutty, wholesome taste, and the molasses lends to its  dense sweetness :) Mmmmmm! 

On the afternoon that Becky was teaching me how to bake this special bread, I got so excited when I saw there was molasses in it; I LOVE the rich flavor of molasses. Becky laughed and shared a great story...
Becky grew up in Bolivia, and as a kid- molasses was such a treat for her down there. When she was little, she used to go over to a friend's house and they would get spoonfuls out of her friend's mom's molasses jar for a special treat. One day, driving on the narrow Bolivian roads, a large truck overturned and TONS of molasses was spilling out. The driver told everyone to gather molasses if they wished, as it was all spilling to waste! There happened to be a large tupperware container in the back of their car, so little becky got to fill it with molasses. She had died and gone to heaven! ...until she ate herself so sick on molasses that she still has a hard time even smelling it to this day! Luckily though, she still enjoys this oatmeal bread :)


*Nutrition Noteworthy: Molasses is a great source of Iron commonly recommended for those who are anemic.

Recipe (makes 2 LARGE loafs, or 1 Large loaf + 1 Large tray of rolls): 

  • 2 packages (4 1/2 teaspoons) Yeast 
  • 1/2 cup Warm Water (for rising yeast)
  • 1/2 teaspoon Sugar (for rising yeast)


  • 1 1/2 cup Quick Oats
  • 1/4 cup Butter
  • 1/2 cup Molasses
  • 1 Tablespoon Salt
  • 1/4 cup Brown Sugar
  • 1 2/3 cups Boiling Water

  • 2 Eggs
  • 6 cups Flour

In a glass container, dissolve the 1/2 tsp sugar in the 1/2 c. warm water and stir in the yeast. Allow to rise while you mix your next ingredients...


...while your yeast is proofing, combine the Oats, Butter, Molasses, Salt, and Brown Sugar: 
Then pour the boiling water over it, and stir until the butter is melted and all the ingredients are combined: 

 Then crack in the 2 eggs and stir well into the oat mixture. THEN you can finally add in the proofed yeast and stir well: 

 Add the flour in 1 cup increments, kneading until you get a warm, supple, dough ball- almost the same smooth, stiffness as play dough.  
It did not require any more than 6 cups flour.

Here is Amy, the youngest of the 4 Dean kids, buttering all of the baking dishes:

We doubled the recipe, and it made this much PLUS another loaf that didn't make it in this picture:
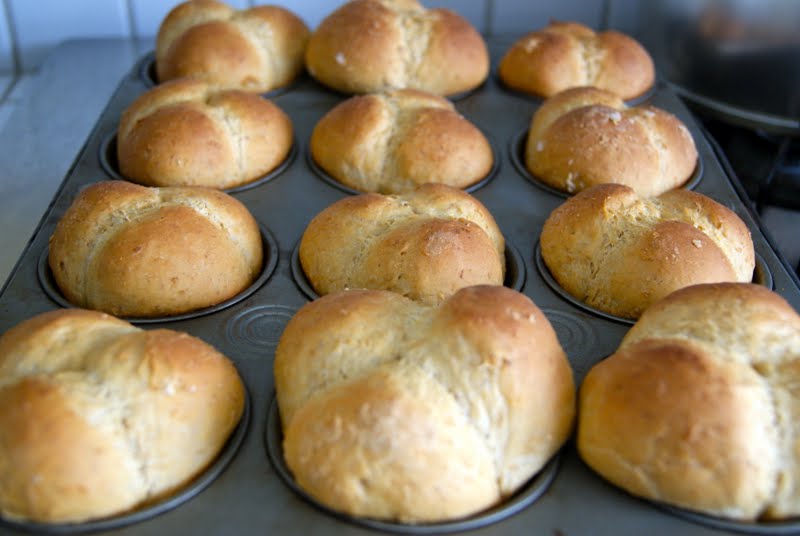
(the large loaf was exactly 1/2 of one recipe yield, and the dinner rolls were made by rolling the other 1/2 of the dough into either large balls in the glass casserole, or 3 small balls into each cupcake tin to make the clover rolls.)

We covered the dough with a large tea towel and let it rise (about 30-40 minutes): 

Look at how beautifully all of the dough rose!

These baked goodies went for 30 minutes at 325 degrees F, and out came warm, delicious rolls and loaves! 
While they were still warm out of the oven, Becky rubbed the tops lightly with a little spread of butter (something that I used to watch Nana do when she made rolls also!)

We had to eat some right away while they were warm :D 
Some of these clover rolls were pulled apart and enjoyed with a little butter and some with jam, and some with both!

 Oh my goodness- this is a beautiful sight! 
Peter and I enjoyed this loaf ALL WEEK. Every morning we would toast another slice and sit together while we savored every warm bite :)


Thank you Becky!!!

Friday, May 6, 2011

STUFFED French Toast


So I've said before that one of Peter's FAVORITE breakfasts is french toast made from a fresh loaf of homemade challah bread. Well, we both had a mid-week day off, so I decided to go big for breakfast on our day off together. I took his favorite french toast and kicked it up a notch... stuffed french toast! Of course I was inspired by all the fresh strawberries in the markets right now :) 

I basically followed my regular french toast recipe, except I added some orange zest as well as I bumped up the eggs and milk a bit since I am using just a few more slices of bread this time.

Recipe: 
  • 4 eggs
  • 1 1/2 cups nonfat milk
  • 2 Tablespoons honey
  • 2 tsp vanilla
  • 2 tsp cinnamon
  • 1/4 teaspoon salt
  • Zest of one Orange, plus a few squeezes of juice from   that zested orange
  • Bread (I used 6, half-inch thick slices of sweet homemade challah bread)


Filling: 
  • 10-15 Strawberries
  • 1 Tbsp. Sugar
  • 4 oz. light Cream Cheese or 'Neufchatel' Cheese
The night before, I washed, chopped, and tossed my strawberries with 1 tablespoon of sugar. I covered it with plastic wrap and let that juice overnight in the fridge. In the morning, I very lightly pureed the strawberries with a hand blender (I didn't want it totally pureed because I wanted to get some actual strawberry pieces in our bites of french toast :)


Then, I whipped the light cream cheese for a little bit...
...and added the strawberry puree into the mix (reserve some of the strawberry puree for serving later):


Then, just like in my other french toast recipe, I soaked the bread in the egg mixture, but only for a few seconds on each side because these slices are much thinner and will 'sog' faster and thus fall apart more easily:


As I soak each piece, I lay it on a cookie cooling rack that has been set up over a jelly roll pan to catch any drippings. 
I spread some of the strawberries-n-cream filling on one slice, then top it with another slice.
While the bread is still somewhat soggy, I lightly squeezed around the edges to help seal the filling inside the seams:

I grilled the french toast on my big electric griddle until it had a beautiful golden crisp on the outside of each side:

When all the stuffed-toasts had been grilled 'till golden, I slid them back onto the cooling rack and into a preheated 350 degree F oven for about 5-10 minutes (I didn't really keep track of the time, I just put them in 'till they puffed up and until we were ready to eat). 
This serves multiple purposes: 1) it cooks all that soaked bread all the way into the center, and 2) it keeps them hot until you are ready to eat.

I sliced each piece diagonally so that you could see all the sweet, creamy, pink filling inside the french toast!

Served with some fresh fruit, whipped cream, syrup and some of the strawberry puree.... this is to die for!!!!!
Of course Peter had the double-decker serving! hehe

Friday, April 8, 2011

Cinnamon Rolls


In the fall, I visited my friend, Rose, who had recently moved to Washington DC. While I was there, I was tempted by LOTS of delicious cinnamon rolls at bakeries, cafes, and farmers markets. I felt like they were calling my name everywhere we went! I've never had a thing for cinnamon rolls before, but that's all it took. However, I didn't give in to those calling to me on my visit; instead, it made me want to come home and create a perfect cinnamon roll. This is the one. 


I found this killer recipe on another blog and I'll never have to try another recipe again. Seriously, this one is killer. I've only had this magic recipe in my hands for 4 months now, but I've made them at least half a dozen times already (not sure if I should admit that). I even made a double batch on Christmas morning for our families. Having so much practice in such a short period of time, I have built in as many shortcuts as I could. You can even start them in the evening so that you don't have to wake up super early for fresh rolls at breakfast time! I will include the timeline that I like to follow, in bold and underlined print (like this), to make this as easy as possible for you to follow and make at home. I think this is the final cut. Easy. Delicous. Done. I hope you enjoy :)


Shopping List: 


  • 1 Tbsp active dry yeast
  • 1/2 C warm water (think jacuzzi temp, not boiling.)
  • 4 C all-purpose flour
  • 1 tsp salt
  • 4 large eggs
  • 1/4 C sugar
  • 2 sticks butter, (plus an optional 2 Tbsp butter):                      1/2 C (1 stick) real butter at room temp (for dough)                   + 6 Tbsp (3/4 stick) real butter at room temp (for filling)          + 2 Tbsp (1/4 stick) melted butter (for glaze)                            (+ *optional* 2 Tbsp butter, for tops of rolls before cooking)
  • 3/4 C packed brown sugar
  • 1 Tbsp cinnamon
  • 1 C powdered sugar
  • 2 Tbsp milk
  • 1 tsp vanilla extract

(This part I start before dinner):
In a small glass bowl or measuring cup, warm 1/2 C water in microwave (approx 30 seconds), dissolve maybe 2 tsp to 1 Tbsp sugar in warm/hot water, and sprinkle in 1 Tbsp. active dry yeast. Let stand in a warm spot for about 30 minutes.
(it should foam up pretty tall- if not, then the yeast is either no longer active, or the water was too hot and killed the yeast bacteria).


**Helpful Hint: Just like I mentioned in my Challah Bread post, a great warm incubator for proofing yeast is an oven that was heated to 100 degrees F, and then turned off.

If you have a stand mixer, dump in your yeast mixture at this time, and proceed to add the following ingredients and use the dough hook attachment (no higher than speed 2) to mix for about 10 minutes or so. 
(If you do not have a stand mixer, add the following ingredients into a large -preferably metal- bowl with the yeast mixture and combine with a fork):
Add the 4 large eggs, 1/4 cup sugar, 1 stick of room temp butter, 1 tsp salt, and 4 cups flour to the yeast mixture. 
Dough should pull away from sides of bowl. Add a bit more flour to reduce stickiness if needed, but don't add too much otherwise the finished cinnamon rolls will taste dry. It should be dense, moist, and pliable JUST like playdough, except shinier. It should not be too wet or sticky. 

Now rub a little vegetable oil all over the dough ball and place back into the large metal bowl. Cover top of bowl with plastic wrap, set in a warm spot (again, I preheat oven to 100 degrees and then turn it OFF and put my bowl in the oven and close the door). Let rise until at least doubled, about 2 hours.


While dough is rising, prepare filling. Beat 6 Tbsp butter, 3/4 C. brown sugar, and 1 Tbsp cinnamon together (takes only about 1 minute). It will be rather thick.


(Now prepare/eat/go out for dinner while the dough rises for a couple hours, then after dinner/dessert...):
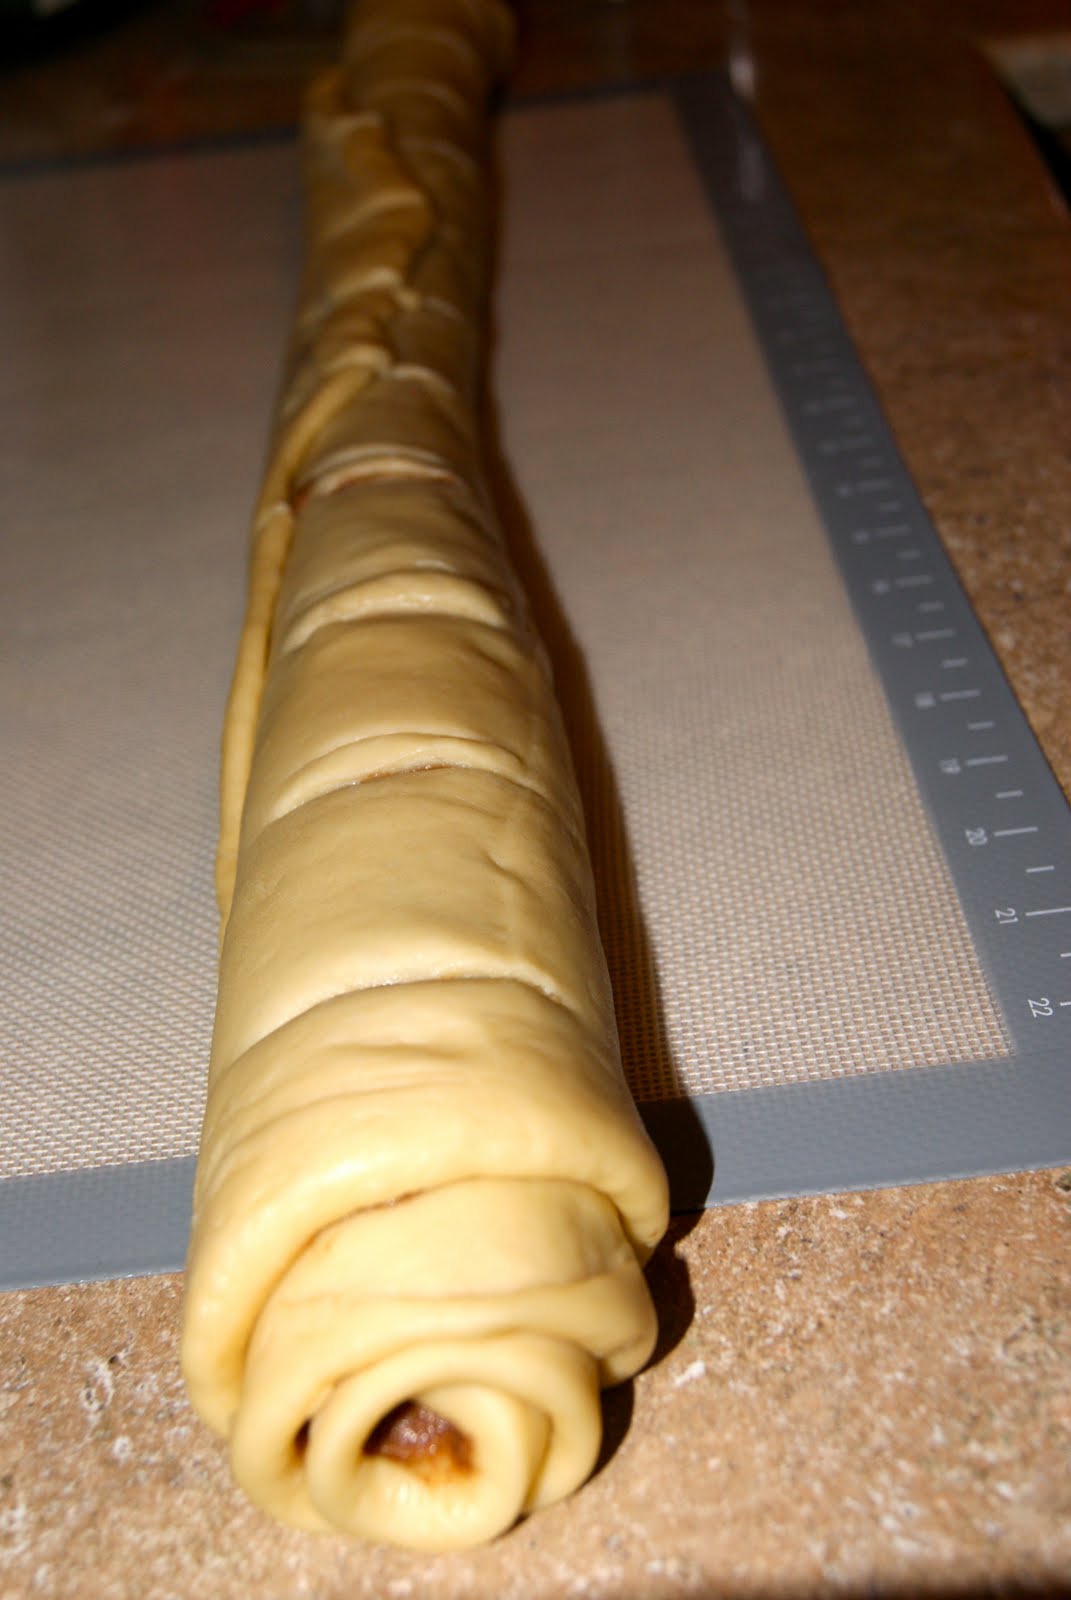
Transfer the dough to a floured work surface. Roll out into a LARGE rectangle about 1/4 inch thick or less... look how big it is! You can even see through the dough that it rolled out way beyond the size of my large silicon dough mat surface!


Spread filling onto dough. Use a spoon (or your fingers) to spread it out evenly. 


Then roll up length-wise, and score the rolls so you know you're going to cut them into even sizes (about 2.5 or 3 inches each to yield 12 rolls). 
** OR you could roll it from the short end and you would get less rolls, but they would be HUGE fatties!
Either way, be sure to score the rolls before you slice them: I'm the daughter of a contractor, trust me- I know how important it is to measure twice and cut once. The other way around just doesn't work. Here, you can end up with one little runt if you don't measure them out first.

Then slide dental floss underneath the rolls, cross over the top where it is scored, and pull. You'll get razor sharp cuts without smashing your rolls. This preserves the pretty spiral design. If you cut with a knife, it kind of tends to smoosh the spiral... not as pretty.

BUTTER or spray your dish before placing rolls in it! Place rolls in baking dish. Cover tightly with plastic wrap and you can either, place in the fridge overnight. Or I've had best luck bypassing the fridge and just letting them rise in that oven until I wake up in the morning around 6:30 or 7 am. This makes them very big and fluffy!


This is what they looked like when I went to bed:
This is what they looked like when I woke up:

**(If you placed them in the fridge overnight, remove them in the morning and let warm and rise in that preheated/OFF oven spot until half again as high, at least an hour or so... so you'll have to set your alarm for really early (like 4 am) if you want them ready in time for breakfast. -this is why I prefer to make them late at night and just let them rise in the oven until the morning.)

(30 to 40 minutes before you want them ready on the table):
Preheat the oven to 350. 
**Optional: paint 2 tbsp melted butter over the tops of the rolls. Bake until golden brown, about 20-30 minutes. 


While rolls are baking, mix the glaze. 1 C. powdered sugar, 2 Tbsp melted butter, 2 Tbsp milk, 1 t vanilla extract. (Or you can make a cream cheese frosting instead. Cream cheese frostings are super yummy on cinnamon rolls as well... that's what Cinnabon uses) 
Let cool in the pan for 5-10 minutes. WAIT the full time necessary to cool before you glaze, otherwise it will instantly melt and fall into the crevices between the rolls, and you won't see the pretty white glaze. 


Enjoy while warm :)

And you can never go wrong with a cup of coffee to accompany this roll :)