Sunday, August 28, 2011

Molten Chocolate Lava Souffle Cakes


My dad is the BIGGEST chocolate lover... ever! To him, dessert isn't dessert unless there is chocolate involved. Whenever we would eat out at restaurants, we could take one glance at the dessert menu and know exactly which one he would order; it's always whatever option is was most ooey gooey and chocolatey....either a hot fudge brownie sundae, a molten chocolate lava cake, or some fudgey chocolate mountain cake. On top of that, he always asks for extra vanilla ice cream with whichever dessert he orders (a bad habit I've picked up). I mean, the man knows how to do dessert right.... and now I'm so busted if he reads this.


Anyway, I've always wanted to learn to make those lava cakes that we would see at his favorite restaurants, but I always thought they were super tricky. I have finally learned and it was SO much easier than I thought! In fact, you can make all of it in about 10 minutes if you can multitask. Mix the yolks while the chocolate is melting, stir those two together, and once you beat the egg whites these little souffles are in the oven before you know it- all in less than 10 minutes!


They are great for entertaining too, because you can make them ahead of time, even a day before, and store them in the fridge until you are ready to put them in the oven. This particular time that I made them, Peter and I had our friends, Zack and Mallory, over for dinner and I made all of it ahead of time EXCEPT for the beaten egg whites (because I didn't want them to deflate in the fridge). All I had to do was warm the chocolate mixture back up, beat the whites and fold them in, and we had fresh warm lava cakes ready on demand!


Recipe (serves 4):
  • 1/2 cup (1 stick) Salted Butter
  • 6 ounces chocolate (I used semi sweet chips, but you can use any chocolate that you like :)
  • 1 teaspoon Instant Coffee granules
  • 3 Large Eggs, separated
  • 1/3 cup Granulated Sugar, plus 1 Tablespoon
  • 1 teaspoon Vanilla Extract
  • 1/8 teaspoon Cream of Tartar


For Serving:
  • Powdered Sugar
  • Vanilla Ice Cream
  • Coffee
  • Milk


Preheat the oven to 400 degrees Fahrenheit. Butter and then sugar the insides of your baking ramekins, and place them on a baking sheet. Set this aside so that they will be ready and waiting for you when you are ready to pour the batter into them later.

Over a double boiler, melt 1/2 cup (1 stick butter) and 6 ounces of chocolate (just like when making chocolate for fondue).
If your butter is cold, you will need to dice it up into cubes so that it will melt at the same rate as the chocolate. If it is room temperature, then no dicing is necessary. This should only take about 5 minutes. After the chocolate-butter mixture is all melted and combined, stir in 1 teaspoon of instant coffee until completely melted into the chocolate.

In a separate bowl, mix together the 3 egg yolks and 1/3 cup granulated sugar until thick and pale (just like when making ice cream). If using a stand mixer, this should only take about 4 or 5 minutes. then stir in the 1 tsp. vanilla:

Gently stir this yolk mixture into the chocolate bowl:

Place the 3 egg whites, the 1/8 tsp cream of tartar, and 1 Tbsp granulated sugar in a new bowl, or clean the yolk bowl and dry it completely (if there is any water moisture or oily residue left in the bowl, the whites you are about to whip won't reach their full potential). Whip this together until firm peaks form; about 5 minutes or so:

GENTLY fold this mixture into the chocolate in 2 batches. Fold in the first half of the whites gently until combined, then fold in the second half of the whites -gently again- until just combined. Do not over mix or else your whites will deflate! You have to be careful not to break down the stiffness of the firm egg whites; this is what will give your cakes volume and make your souffles rise and puff the way they are supposed to. Pour the batter into the 4 ramekins.

Bake at 400 degrees F for 13-15 minutes. Their 'puffiness' will start falling within a few minutes of pulling them out of the oven, so serve and enjoy immediately. 

You can dust with powdered sugar on top and serve with a side of vanilla ice cream. I put the ice cream right on top because I love when the ice cream melts into the warm molten middle, but technically I think that goes against souffle rules since it automatically deflates the souffle.... but hey, I'm okay with breaking rules for ice cream :)
I mean, look at this guy- he is just screaming for some ice cream!

Mmmmmm...


They are SUPER moist and 'molteny' inside :) ...and VERY rich, so vanilla ice cream and/or a cup of milk is necessary!

Friday, August 19, 2011

Loaded Turkey Meat Balls

I had been dying for some hearty Italian food, so I finally just made it. You can definitely use ground beef in place of the ground turkey (as usual, I chose ground turkey just because it's too easy of a tweak to make the meal healthier). But I also understand that sometimes.... you just gotta go all out and live a little! Whether you use beef or turkey or a combination of meats, these loaded meatballs -seasoned with lots of flavor and loaded with a molten mozzarella center- will certainly fill you up.


Meatball Ingredients (makes 12 large meatballs, serves 4-6):

  • 1/2 large Yellow Onion, finely diced
  • 2 teaspoons Garlic, minced (about 3 cloves)
  • 1/3 cup seasoned Bread Crumbs
  • 1 teaspoon dried Basil (or whichever Italian seasonings or blends you prefer)
  • 1/2 teaspoon Red Pepper Flakes
  • a few cranks of ground Black Pepper
  • 1/3 cup grated Parmesan Cheese
  • 1 large Egg
  • 1 generous Tablespoon of Tomato Paste
  • 1 lb. Lean Ground Turkey

additional ingredients if making marinara sauce:

  • 1/2 large Yellow Onion, diced
  • 2 teaspoons Garlic, minced
  • 1/2 cup Red Wine (I used Cab Sav, but use what you like)
  • 1 can Tomato Paste (minus the Tbsp used to make the meatballs)
  • 28 oz. can Crushed Tomatoes
  • 1/2 teaspoon Red Pepper Flakes
  • 1 teaspoon minced Garlic
  • Basil or other Italian seasonings

Heat extra virgin olive oil over medium heat, then add the finely diced onions. Reduce heat to medium-low and sautee onions until golden brown and translucent (almost 10 minutes). (At this time, remove half the sauteed onion and save for use later when making the sauce). Then add the 2 tsps minced garlic and continue to saute for no more than one more minute. Transfer sauteed onion mixture to a large bowl:

toss with the bread crumbs, allow to cool a little:

Add basil, red pepper flakes, ground black pepper, and parmesan cheese. Mix well. 

Then add the remaining ingredients (egg, tomato paste, and ground turkey). Use your hands to make sure it is all mixed together. 

Form into 12 large meatballs. Push a hole into each meatball, stuff with a cube of mozzarella, and seal up the hole again. 

In the same pan as used to sautee onion, heat more E.V.O.O. and sear all the meatballs turning every few minutes until golden-browned on all sides. 

Then transfer to a 400 degree F oven for 15 minutes.

Now use your meatball pan to make your red sauce. Over medium heat, pour 1/2 cup red wine into the pan and scrape all the yummy flavors from the bottom of the pan into your sauce. Stir frequently and allow the wine to thicken. 

Then add the other half of the sauteed onions, the additional garlic, and the remainder of the tomato paste can, stir well. Then continue as with this quick marinara recipe, by adding the crushed tomatoes, red pepper flakes, and basil -or any other desired seasonings. Turn heat to LOW, and let sauce simmer so that it can thicken and all the flavors can marry together. 

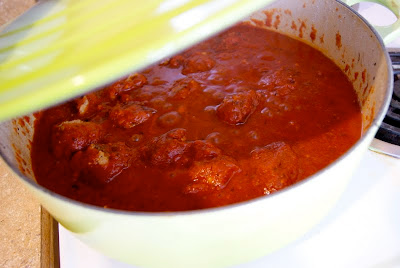
Now, nestle the meatballs into the sauce. 

Give them a good stir and keep warm over LOW heat until ready to serve.

A healthier version of such a yummy comfort food, mmmm....

Wednesday, August 17, 2011

Cafe Latte- no expensive machine required.


So I was looking to get an espresso machine since Peter and I love coffee and love going out to get a latte or a mocha as a treat once in awhile. I was so excited about getting an espresso machine that I started researching recipes and techniques before we even got the thing! 
While I was searching the web, I came across a 'how to' page with step by step instructions on how to make homemade specialty drinks without an espresso machine! This led to more research and even YouTube videos teaching me how to do this. All I needed was a french press and a stovetop espresso brewer (both of which we already had!). If you don't have those, you can find them anywhere for around $10-20... a fraction of what an espresso machine would cost, plus a lot less storage space required (added value in our tiny little cottage).
I saved money and kitchen space and still have fresh, handmade specialty drinks in less than 5 minutes :)


I already love these drinks to begin with, but I love even more the rustic, 'pioneer' feeling of getting to make them by hand (well, plus the help of a couple gadgets- but even those pieces are classic, old fashioned tools that have been around since back in the day.)


Ingredients: 
Finely Ground Espresso Beans
Milk (I used nonfat, you can use any milk or cream that you desire)


Fun Flavored Options: 

  • Some vanilla extract & a little powdered sugar dissolved into the milk to make a vanilla latte
  • A couple tablespoons of French Vanilla flavored coffee creamer mixed into the milk to make a vanilla latte
  • Chocolate powder or syrup to make a mocha latte. 
  • Be creative! ...the possibilities are endless :)

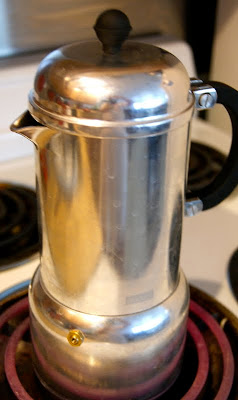
First start your espresso on the stovetop, and set a timer to 5 minutes:

Then, fill your french press with desired amount of milk (I use about 1 cup milk for the 2 of us).
Microwave about 45 seconds to 1 minute until it is steaming and starts to froth slightly:

Load glass cylinder of steamed milk back into its french press handle. Place french press top into place. (I tilt my french press to increase the surface area of the milk while I pump it):

 Pump for about 15 seconds. This action forces air in between the protein molecules of the milk/cream, creating frothed milk. You can see how the original milk in this french press tripled in volume once I frothed it.
Steamed milk still remains in the bottom of the press, while the frothed milk sits on top:

By the time your milk is steamed and frothed, your espresso should be just about ready: 

 Fill glass half way with espresso. Then pour the steamed milk from the bottom of the french press into the espresso, and finish by pouring the frothed milk on top:
Look at that beautiful froth. So thick you can almost eat it! 
These Saturday morning lattes were enjoyed with these warm muffins made from my same banana bread recipe, and they were topped with some extra streusel topping from our crumble dessert the night before :)

Monday, August 15, 2011

'Kringle' -Scandinavian Pastry


'What is kringle?' you might ask...  it is a DELICIOUS danish pastry! It looks tricky and impressive, but you will see how simple it is to make. It is perfect for a brunch, a tea, entertaining guests for breakfast- or even for dessert!


This is another recipe from Becky Dean. While Becky was teaching me how to make her family's oatmeal bread, we flipped through some other recipes in her book. To my surprise, I saw a slew of Norwegian and Scandinavian recipes! Peter is Norwegian, and his mom has shared several traditional Norwegian dishes with me. Needless to say, I was so excited to see more scandinavian recipes- some already familiar and some new! I mentioned in the oatmeal bread blog post that Becky was raised in Bolivia; well, her upbringing may have been in South America but her blood is definitely Norwegian! While our oatmeal bread was rising, Becky taught me how to whip up this quick and scrumptious 'kringle' pastry.


Recipe (makes 2 large pastries, serves about 12):


Crust:
1 cup Flour
1/2 cup Butter
1 Tablespoon Water


Pastry Top:
1 cup Water
1/2 cup Butter
1 cup Flour
3 eggs
1/2 teaspoon Almond Extract


Frosting:
1 cup Powdered Sugar
1 Tablespoon Butter, softened
a dash of milk
*optional: dash of almond extract or vanilla extract


Cut together the flour, butter, and water together to make the crust:

Then divide the crust dough into 2 equal portions. Mold each half of the dough into a long strip onto a cookie sheet. Then press and spread until it is thin and looks like Becky's below: 

Set these to the side, while you make the next part...

Then, combine 1 cup of water and 1/2 butter in a saucepan over medium high heat:
 When it comes to a boil, remove the pan from the heat and stir in 1 cup of flour:
 Suddenly it will transform into a super silky smooth playdough!

Then stir in 3 eggs, one at a time:
 After the addition of each egg, it becomes a super weird consistency and it seems impossible to combine, but...
 ...after a particular stir, it suddenly becomes smooth and combined again:

After each egg has been stirred in, mix in 1/2 tsp almond extract. 
Spread this pastry dough over the uncooked crust dough so that you have 2 layers of dough (sorry, forgot to take a picture of that part)

Bake the layered doughs for 45 minutes at 400 degrees Fahrenheit.  
They come out super puffy... 
 ...but let them sit for a few minutes to relax and fall down, and leave behind a beautifully rustic-textured top:

While the pastry is sitting, mix the icing. Spread all over the tops when the pastries are done relaxing:

We just cut pieces right out of these pastries and enjoyed them right away!

Best when fresh out of the oven!!!!!