Showing posts with label Appetizer. Show all posts

Wednesday, August 29, 2012

Oven-Roasted Parmesan Tomatoes


I needed a veggie side to go with our parmesan tilapia dinner, and I had some extra tomatoes in the fridge, so these delicious little treats were born :)

They are roast-y on the outside and juicy on the inside. They have a delicious golden parmesan crust and a little sprinkle of basil adds a big complimentary punch of flavor. Absolutely beautiful.

Tomatoes are even better for you when they are cooked anyway! A lot of people are worried about losing nutrients when they cook their fruits and veggies, but tomatoes are actually more powerful for you when they are cooked. That's why it's commonly recommended to include red pasta sauce into your weekly menu rotation, or canned tomatoes, tomato soup, ...any form of cooked tomatoe... like these warm little roasted tomatoes! :)
One of the great nutritional components of tomatoes is 'lycopene', and it is lycopene that is activated when heated/processed/cooked. In fact, the lycopene in a tomato is roughly 4 times more bioavailable when it is cooked (i.e. pasta sauce) rather than when eaten raw (i.e. in a salad). Lycopene is a powerful antioxidant and is believed to possibly help prevent cancer -especially prostate cancer. It is found in several fruits and veggies (mostly red-orange colored ones) but is most well known in tomatoes since they contain such high levels of lycopene. Lycopene is also fat-soluble, which means the more olive oil you eat with it, the better it is absorbed into your body :)
So let's start oilin' and cookin' our tomatoes!...

Ingredient List:
  • Tomatoes (I used Romas, but I suppose you can use any firm ones that you like or that you already have on hand)
  • Olive Oil
  • Basil (I used crushed dried Basil, but you could use fresh as well)
  • Parmesan Cheese
  • Black Pepper
Preheat the oven to 400 degrees Fahrenheit. 

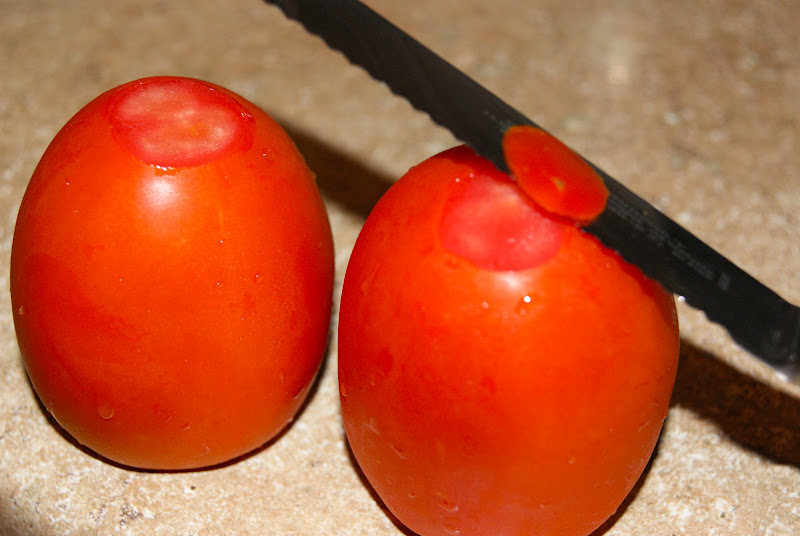
Slice the tomatoes into about 1 inch slices. (To use the ends, slice just a tiny tip off each end of the tomato to give them a footprint to stand on and the open slice on top; see picture below)
Line a baking sheet with foil and drizzle with olive oil. Lay the tomato slices on the olive oil, and drizzle the tops of the tomato slices with olive oil as well, and a good sprinkling of basil.

Now top each tomato slice with a hearty pinch of Parmesan, and a little dash of black pepper.

Roast the tomatoes at 400 degrees for about 15 minutes so that the tomatoes get roasty and heated through, and the cheese melts on top. Then finish them off under the broiler for just a few minutes to give the cheese a golden, bubbly crust on top.


They are so simple yet so divine! Look at that beautiful roasted skin, the warm juicy inside, and the bubbly basily cheese :)


I served mine alongside parmesan tilapia and creamy risotto:

Sunday, April 22, 2012

Watermelon Fruit Basket


These are so fun to make. These fruit baskets can even double as a center piece on a small or crowded table since they are so cute to look at but also serve a practical purpose.

I've made these for birthdays, showers, and bbq's. This particular basket was made for our Easter brunch table this year. I kind of had to make it in a hurry because everyone was ready to eat! The boys always play wiffle ball in the backyard, and once they are called inside to eat, they are not willing to wait long or else they comment about how they could still be playing outside. hahaha :) 

First, wash your watermelon. Then, rotate it around until you find which side would make the best bottom:

Place the tip of a sharp serrated knif right under the watermelon- right there where it is touching the counter top- and gently spin the watermelon around to etch a circle under your watermelon. Then take your knife and carefully shave that circle to create a 'foot print' for your watermelon to stand on (or else it might rock back and forth later and dump your salad out)... BUT be *very cautious* NOT to break into the red part of the melon.

With your melon standing on its 'footing', take your knife tip and etch the handle and sides of the basket. Essentially, it will just be two big wedges that you are cutting out. Make sure the two sides are basically even and matching before you cut into it. 

Cut the two wedges out and save them for eating later... I gave mine to the boys that were playing wiffle ball outside. 

Then carefully slice along the underside of your basket handle and release the entire inner section of fruit. 

Then use a melon-baller to get all the fruit out of the inside of the melon basket. 
*TAKE IT EASY at the bottom of the basket. Remember that foot you cut out of the bottom? If you are too aggressive getting the melon out, you might go right through the bottom and end up with a leaky basket (I guess there are worse things in life)

Then carve any detail you like around the edge of the basket. Mine isn't the prettiest or most professional-looking (since the boys were on their way in), but you get the idea here:

Then mix your melon balls with any fruit assortment you like for a fruit salad. Here is the final product presented on our easter brunch table:

I usually like to decorate around my basket with pretty and edible foliage, like grape leaves on a curly vine or bright orange nasturtiums.

Since your are removing all the melon from inside the basket and then filling all that melon PLUS other fruits back into the shell, you will have enough mixed fruit salad to fill and refill the fruit 'basket'.

Wednesday, February 1, 2012

Jalapeno Cream Cheese-&-Crackers


This is another AWESOME appetizer.... and just in time for Super Bowl parties! 
Don't be deceived by the jalapeno, this appetizer is hardly spicy at all. You can control the heat by using mild jalapeno jelly. Plus, jelly has enough sugar in it that it mellows out the spiciness, and the cream cheese definitely calms down any spiciness as well. The first time I had this was at my Aunt's house like 15 years ago! She served this appetizer before dinner and I think I ate most of it! I LOVED it. As a little girl, I didn't like jalapenos or spicy foods at all (what kid does?), but this is an unusually tantalizing combination of flavors that you must try- even if you don't like spicy flavors. 


Now, there are not a lot of companies that make jalapeno jelly- so my only option is this one company that makes a mild jalapeno jelly in bright green, and a hot jalapeno jelly in bright red. I would prefer to serve the red color since it is more appetizing looking, but since appetizers are to serve a wide variety of people I usually opt for the mild version. Unfortunately, that leaves me with this alien-like bright green one. I'm going to have to start making my own homemade jalapeno jelly because this neon green isn't the most appetizing looking color to serve on a platter. Regardless if it makes people look twice, they will love it! I've had lots of 'spicy-food-haters' who are shocked at how much they love this simple snack and they end up being the ones who eat the most of it. 


It's simple; you can just pick up the 3 ingredients at the store on your way to an event and assemble it in 2 seconds when you get there. This is a great secret to keep in your back pocket for when you find yourself short on time!


This appetizer has all the makings of a beautifully addictive treat: the crackers make it crunchy and salty, the cheese makes it creamy and smooth, the jelly makes it sweet and spicy. This one's got it all :)


Shopping List:

  • 1 box Wheat Thins (reduced fat works fine also)
  • 1 (8 oz) box of Cream Cheese (light versions work well too)
  • 1 jar of Jalapeno Jelly (your choice of mild or hot)


Simply pour the jelly over the top of the cream cheese and serve with the crackers on the side. Don't forget a little cheese spreader knife as well :)

Monday, January 23, 2012

Pastry Pinwheel Appetizers


So this post is going to be a 2-for-1 deal because I'm going to share TWO different versions of the same appetizer: Spinach Asiago pinwheels, AND Garlic Cheddar Pinwheels. Well, really it's like an infinite amount of different appetizers from one recipe since you can take this idea and recreate it a million different ways with all kinds of different ingredients and flavors rolled up inside of them (lots of ideas listed at the bottom of this post too).


This recipe uses puff pastry; I just use the frozen kind at the market, because it is so much easier than making it at home and doesn't taste any less than homemade. Plus you get TWO sheets of puff pastry in one box- so you can either double the recipe of your favorite flavor below, or you can make each one.


I made these for a New Year's Eve Party. Now, it's a great time to share them, though, because the Super Bowl is nearing and I think these will make a great super bowl party snack! This is one that both guys and girls like :)


Spinach-Cheese Pinwheels:
  • 1 sheet Puff Pastry, THAWED (buy the frozen kind at the supermarket. They usually come in a box with 2 puff pastry sheets. But BE SURE to let yours thaw before starting this)
  • 1 large Egg + 1 Tbsp Water
  • 1 package Spinach (again, just buy the frozen box at the supermarket), thawed and WELL DRAINED (really squeeze all the liquid out of it)
  • 3/4 cup shredded Cheese- you can use any type you like, but I used Asiago here! Some other yummy options are: Mozzarella, Gruyere, or Muenster.
  • 1/4 cup grated Parmesan Cheese
  • 1/8 tsp Garlic Powder
  • AP Flour for work surface
Garlic-Cheddar Pinwheels:
  • 1 sheet Puff Pastry, THAWED (buy the frozen kind at the supermarket. They usually come in a box with 2 puff pastry sheets. But BE SURE to let yours thaw before starting this)
  • 1 large Egg + 1 Tbsp Water
  • 2 Tablespoons minced Garlic
  • 1 cup shredded Cheddar Cheese
  • 1/4 cup grated Parmesan Cheese
  • AP Flour for work surface
Spinach-Cheese Pinwheels:
Preheat oven to 400 degrees Fahrenheit. 
Lay one sheet of pastry dough on a well-floured surface, and roll out using a rolling pin into a large rectangle. 

Beat together egg and water in one bowl or cup. Mix shredded cheese, grated parmesan, and garlic powder in a separate bowl. 
  1. Paint egg wash onto rolled out pastry sheet. (reserve a little for later use)
  2. Squeeze all liquid out of defrosted spinach. Spread evenly across the pastry sheet. 
  3. Sprinkle cheese mix evenly over top of spinach layer. 


Starting at a short side of the rectangle, roll up. Seal well (use a little egg wash if you need to, in order to seal up the seam.)

Slice into 1/2 inch pinwheels (makes about 22)
*HELPFUL HINT: when I make cinnamon rolls I like to use floss to slice through the dough-y roll. HOWEVER, that does NOT work with these because the floss doesn't slice through the spinach, so it grabs it and pulls out the spinach instead. Unfortunately you have to use a sharp serrated knife and saw gently for each pinwheel. Use more back and forth motion and less pressing down motion to preserve the best shape & swirl of your pinwheels.

Lay them out onto a baking sheet with parchment paper or a silicone baking mat. Brush tops lightly with remaining egg wash (this help them maintain a glossy appearance after they've cooked)

Bake at 400 degrees for 15 minutes, or until they turn golden brown. 

Transfer to wire rack and allow to cool slightly before serving.


Garlic-Cheddar Pinwheels:
Preheat oven to 400 degrees Fahrenheit. 
Lay one sheet of pastry dough on a well-floured surface, and roll out using a rolling pin into a large rectangle. 

Beat together egg and water in one bowl or cup. 
  1. Paint egg wash on rolled out pastry sheet. (reserve a little for later use)
  2. Spread minced garlic evenly across the pastry sheet. 
  3. Sprinkle cheddar & parmesan evenly over top of garlic layer. 

Starting at a short side of the rectangle, roll up. Seal well (use a little egg wash if you need to, in order to seal up the seam.)

Slice into 1/2 inch pinwheels (makes about 22)
*HELPFUL HINT: when I make cinnamon rolls I like to use floss to slice through the dough-y roll. That DOES work like magic with these too! It doesn't work with spinach (as stated earlier) but 
using floss to slice the pinwheels works GREAT here.

Lay them out onto a baking sheet with parchment paper or a silicone baking mat. Brush tops lightly with remaining egg wash (this help them maintain a glossy appearance after they've cooked)

Bake at 400 degrees for 15 minutes, or until they golden.

Transfer to wire rack and allow to cool slightly before serving.

Enjoy!

Other flavor ideas: 

Savory: 
-Pesto Sauce & Cheese
-Tomato sauce & Mozzarella
-Ham & Swiss
-Caramelized Onions and Gruyere
-Roasted Red Peppers & Fontina
-Sun dried Tomato, Basil, & Mozzarella

Sweet:
-Melted Chocolate
-Cinnamon & Sugar
-Honey & Walnuts
-Cream Cheese & Jam

Sweet & Savory: 
-Maple & Bacon

LEAVE A COMMENT WITH YOUR FUN IDEAS :)