Showing posts with label Cake. Show all posts

Sunday, August 28, 2011

Molten Chocolate Lava Souffle Cakes


My dad is the BIGGEST chocolate lover... ever! To him, dessert isn't dessert unless there is chocolate involved. Whenever we would eat out at restaurants, we could take one glance at the dessert menu and know exactly which one he would order; it's always whatever option is was most ooey gooey and chocolatey....either a hot fudge brownie sundae, a molten chocolate lava cake, or some fudgey chocolate mountain cake. On top of that, he always asks for extra vanilla ice cream with whichever dessert he orders (a bad habit I've picked up). I mean, the man knows how to do dessert right.... and now I'm so busted if he reads this.


Anyway, I've always wanted to learn to make those lava cakes that we would see at his favorite restaurants, but I always thought they were super tricky. I have finally learned and it was SO much easier than I thought! In fact, you can make all of it in about 10 minutes if you can multitask. Mix the yolks while the chocolate is melting, stir those two together, and once you beat the egg whites these little souffles are in the oven before you know it- all in less than 10 minutes!


They are great for entertaining too, because you can make them ahead of time, even a day before, and store them in the fridge until you are ready to put them in the oven. This particular time that I made them, Peter and I had our friends, Zack and Mallory, over for dinner and I made all of it ahead of time EXCEPT for the beaten egg whites (because I didn't want them to deflate in the fridge). All I had to do was warm the chocolate mixture back up, beat the whites and fold them in, and we had fresh warm lava cakes ready on demand!


Recipe (serves 4):
  • 1/2 cup (1 stick) Salted Butter
  • 6 ounces chocolate (I used semi sweet chips, but you can use any chocolate that you like :)
  • 1 teaspoon Instant Coffee granules
  • 3 Large Eggs, separated
  • 1/3 cup Granulated Sugar, plus 1 Tablespoon
  • 1 teaspoon Vanilla Extract
  • 1/8 teaspoon Cream of Tartar


For Serving:
  • Powdered Sugar
  • Vanilla Ice Cream
  • Coffee
  • Milk


Preheat the oven to 400 degrees Fahrenheit. Butter and then sugar the insides of your baking ramekins, and place them on a baking sheet. Set this aside so that they will be ready and waiting for you when you are ready to pour the batter into them later.

Over a double boiler, melt 1/2 cup (1 stick butter) and 6 ounces of chocolate (just like when making chocolate for fondue).
If your butter is cold, you will need to dice it up into cubes so that it will melt at the same rate as the chocolate. If it is room temperature, then no dicing is necessary. This should only take about 5 minutes. After the chocolate-butter mixture is all melted and combined, stir in 1 teaspoon of instant coffee until completely melted into the chocolate.

In a separate bowl, mix together the 3 egg yolks and 1/3 cup granulated sugar until thick and pale (just like when making ice cream). If using a stand mixer, this should only take about 4 or 5 minutes. then stir in the 1 tsp. vanilla:

Gently stir this yolk mixture into the chocolate bowl:

Place the 3 egg whites, the 1/8 tsp cream of tartar, and 1 Tbsp granulated sugar in a new bowl, or clean the yolk bowl and dry it completely (if there is any water moisture or oily residue left in the bowl, the whites you are about to whip won't reach their full potential). Whip this together until firm peaks form; about 5 minutes or so:

GENTLY fold this mixture into the chocolate in 2 batches. Fold in the first half of the whites gently until combined, then fold in the second half of the whites -gently again- until just combined. Do not over mix or else your whites will deflate! You have to be careful not to break down the stiffness of the firm egg whites; this is what will give your cakes volume and make your souffles rise and puff the way they are supposed to. Pour the batter into the 4 ramekins.

Bake at 400 degrees F for 13-15 minutes. Their 'puffiness' will start falling within a few minutes of pulling them out of the oven, so serve and enjoy immediately. 

You can dust with powdered sugar on top and serve with a side of vanilla ice cream. I put the ice cream right on top because I love when the ice cream melts into the warm molten middle, but technically I think that goes against souffle rules since it automatically deflates the souffle.... but hey, I'm okay with breaking rules for ice cream :)
I mean, look at this guy- he is just screaming for some ice cream!

Mmmmmm...


They are SUPER moist and 'molteny' inside :) ...and VERY rich, so vanilla ice cream and/or a cup of milk is necessary!

Tuesday, May 31, 2011

Decadent Flourless Chocolate Cake


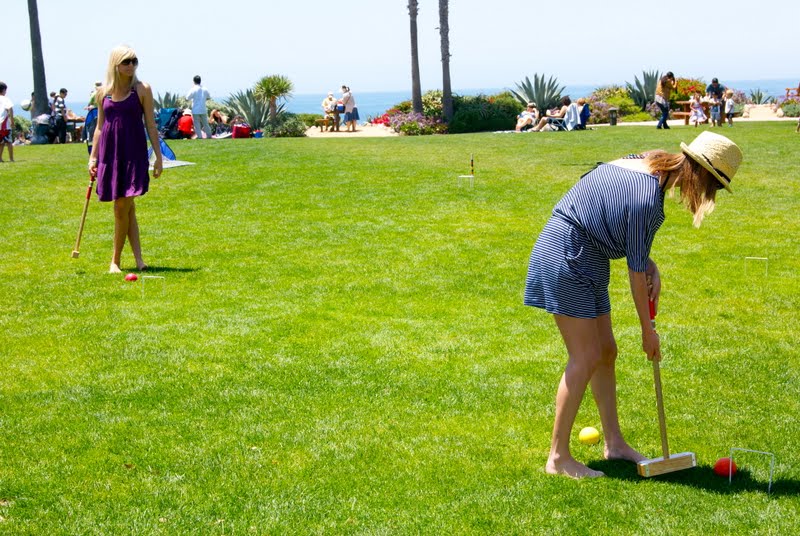
This past memorial day weekend, Peter was gone river rafting on the Kern River for a bachelor party. Therefore, I got to plan some fun girl days! On the actual Memorial Day afternoon, I planned a picnic with my friends Lindsey and Laurie. We set up our picnic on a grassy park right above the beach so that we could also set up CROQUET to play on the lawn! 


In college, Peter and his NINE roommates set up croquet in their front yard; they played all the time- it was awesome... Halftime during the Laker game? Croquet! Free time? Croquet! Want to procrastinate studying? Croquet! These boys turned a recreational past-time into a competitive sport. They played so hard that the set fell to pieces by the time they all graduated. So I got Peter a new croquet set for his birthday last month. We have all been playing it together down here now, and it has been so nostalgic for us all :) However, since the boys are croquet masters from all that practice during their college days, we girls are getting beat up on! This is why it was necessary for us to sneak in a little practice while the boys were gone river rafting :)


To go along with our european lawn game, I planned a french/european 'poet's picnic' (baguette, cheeses, fruit, etc). But I also wanted to make something fun for dessert--- What better than a recipe I learned from Julia Childs- the very woman who brought french cooking to America! It was decided; I would make the flourless chocolate cake that I had learned from one of her cooking shows some time ago :) I added a chocolate ganache glazing and berries whereas Julia Childs added just a sprinkling of powdered sugar atop the cake instead. Either way would be good, but from our experience the ganache was divine. And the cake is so rich that the berries are almost an essential companion. (Also, we couldn't pack ice cream for the picnic of course, but over the following days we enjoyed the leftovers with berries and vanilla ice cream and that was a match made in heaven).


Recipe (serves about 15 since only small slices are required due to its density & richness)


Flourless Chocolate Cake:

  • 2 sticks Salted Butter
  • 8 oz. Chocolate, >60% cacao (Julia used bittersweet, I used Semi Sweet)
  • 1 cup Unsweetened Cacoa
  • 1 1/4 cups granulated Sugar
  • 6 eggs

Chocolate Ganache:

  • 3/4 cup Half & Half or Heavy Cream (I use half & half because it is healthier and it was just fine... I know, I'm making a very unhealthy decadent cake!!!)
  • 8 oz. Semi Sweet Chocolate Chips
  • 2 Tablespoons Butter (this gives it that satiny shine and keeps it shiny)


Melt the 2 sticks of butter and stir in the 8 oz chocolate until melted. 
(I just used a 'double boiler' method of nesting a bowl above a pot of boiling water to melt my butter and chocolate together)


In a separate bowl whisk/sift 1 cup unsweetened cacoa with 1 ¼ cups granulated sugar.
Then stir in 6 eggs.


Then slowly temper in the hot butter/chocolate mixture (or else the eggs will scramble), and combine well:
(temper slowly add in a little bit of the hot chocolate and stir well. Continue adding small amounts of hot chocolate and stirring until it is all incorporated together.)

Butter bottom and sides of a 9 inch springform pan and pour cake batter into springform:

Bake at 350 degrees for about 40 minutes

While cake is cooking, prepare the chocolate ganache icing. Ganache is a chocolate glaze/icing that is typically 1 part chocolate and 1 part cream. The addition of butter gives it that glossy, satin-like shine.

Bring the half and half to a simmer using the double boiler method as above. Then melt in the 2 Tbsps butter. Turn off the heat and stir in the chocolate until completely combined. Remove bowl from pot and let ganache somewhat cool before glazing the cake.

Remove cake from springform pan and transfer to a cooling rack that is set up above a baking sheet (to catch the ganache drippings)

This was our fun picnic spread!

I used fresh strawberry slices to decorate the top of my cake, but I imagine raspberries could be very good as well.

Look at how moist and dense it is! That is the beautiful thing about flourless cakes :)

 Here are Laurie and Lindsey during one of our croquet matches that afternoon:

And here are all three of us with croquet mallets in hand :)

Peter came home from river rafting and was delighted to find the remains of this decadent cake in our kitchen! We found that it was best enjoyed warmed up with a side of creamy vanilla ice cream.

Saturday, March 5, 2011

Angel Food Cake


I have always loved angel food cake because it is really light and not too 'sicky-sweet'.  Ever since I was a little girl I would ask for an angel food cake with strawberries and whipped cream for my birthday.  This week, on my 25th birthday, it was no different :)

In fact, I love angel food cake with strawberries so much, that I even had it for our wedding cake!

I had never made an angel food cake from scratch before, but a year or two ago (I don't remember what inspired me at that time) I decided that store-bought varieties were too dry and I was going to make one myself. I must have looked through 30 different recipes to gather ideas that I liked. I had to have known at the time why I decided the amounts and techniques that I did, but now I have no idea why I have to mix it the way I do; I just follow the directions on the old torn piece of scratch paper that I wrote it on back then, and it faithfully yields the most moist, yet fluffy and perfectly sweet angel food cake every time!

Recipe: 
  • 1 cup Flour
  • 1 1/2 cups Sugar
  • 12 Egg Whites
  • 1/2 tsp Salt
  • 1 1/2 tsp Cream of Tartar
  • 1 1/2 tsp Vanilla


Preheat oven to 375 degrees F. Then sift together the flour and half the sugar (3/4 cup)

Separate the eggs, do not let ANY hint of yolk into your whites. Angel food cake is light and fluffy because the whites rise, but if there is any oil from the yolks then it will not rise quite like it should.
(don't waste the yolks, keep them to make ice cream, or creme brulee or anything else that may require yolks)

**Helpful Hint: Use a very big bowl for your whites, much larger than mine here, because eventually all of your ingredients will end up in this bowl. You will soon see that this one was not quite big enough and I had to transfer it all to a bigger bowl later.

Add the vanilla, cream of tartar, and salt.

Whip to a medium peak (when your 'peak' can stand up on its own, but not quite straight up- it should slouch over like Free Willy's fin)

Then add the other half of the sugar (3/4 cup) to your medium peaks, and whip again until firm (much stronger and stiffer than before.)
See how my bowl was not big enough! And this is without even adding the sifted flour/sugar mix yet!

Now add the sifted flour mixture to your firm-whipped egg mixture, just a little bit at a time...
...and fold in gently until it is well incorporated, but without breaking down the stiffness of your whites too much. It should look smooth, but still be pretty stiff, like this: 

Then carefully transfer it to an UNGREASED angel food cake pan (do not use a non-stick spray!). If you spray it, those oils will cause the same collapsing damage that the oils from the yolks would do!

Bake at 375 degrees F for about 40 minutes

When you take it out, let it cool upside down so that it doesn't fall in while it's cooling... like a bad souffle.
**Helpful Hint: my mom taught me that a wine bottle fits right into the center hole of the pan to hold it upside down while it cools. 

with a long skewer or rubber spatula (or anything non-metal that wont scratch your cake pan), loosen the edges of the cake and invert it onto your platter.

Then top with some of my sister's homemade whipped cream and just a few strawberries!
or maybe a lot of strawberries... and an extra bowl full for serving!

Kinley and 'Baby Blue Bear' are helping to put the birthday candles on the cake

Uh oh! Baby Bear's foot got into the frosting...
   

It was a difficult clean up job, but Kinley didn't complain:

...STILL workin' on it :)


My 25th piece of birthday cake!