Showing posts with label Vegetables. Show all posts

Wednesday, August 29, 2012

Oven-Roasted Parmesan Tomatoes


I needed a veggie side to go with our parmesan tilapia dinner, and I had some extra tomatoes in the fridge, so these delicious little treats were born :)

They are roast-y on the outside and juicy on the inside. They have a delicious golden parmesan crust and a little sprinkle of basil adds a big complimentary punch of flavor. Absolutely beautiful.

Tomatoes are even better for you when they are cooked anyway! A lot of people are worried about losing nutrients when they cook their fruits and veggies, but tomatoes are actually more powerful for you when they are cooked. That's why it's commonly recommended to include red pasta sauce into your weekly menu rotation, or canned tomatoes, tomato soup, ...any form of cooked tomatoe... like these warm little roasted tomatoes! :)
One of the great nutritional components of tomatoes is 'lycopene', and it is lycopene that is activated when heated/processed/cooked. In fact, the lycopene in a tomato is roughly 4 times more bioavailable when it is cooked (i.e. pasta sauce) rather than when eaten raw (i.e. in a salad). Lycopene is a powerful antioxidant and is believed to possibly help prevent cancer -especially prostate cancer. It is found in several fruits and veggies (mostly red-orange colored ones) but is most well known in tomatoes since they contain such high levels of lycopene. Lycopene is also fat-soluble, which means the more olive oil you eat with it, the better it is absorbed into your body :)
So let's start oilin' and cookin' our tomatoes!...

Ingredient List:
  • Tomatoes (I used Romas, but I suppose you can use any firm ones that you like or that you already have on hand)
  • Olive Oil
  • Basil (I used crushed dried Basil, but you could use fresh as well)
  • Parmesan Cheese
  • Black Pepper
Preheat the oven to 400 degrees Fahrenheit. 

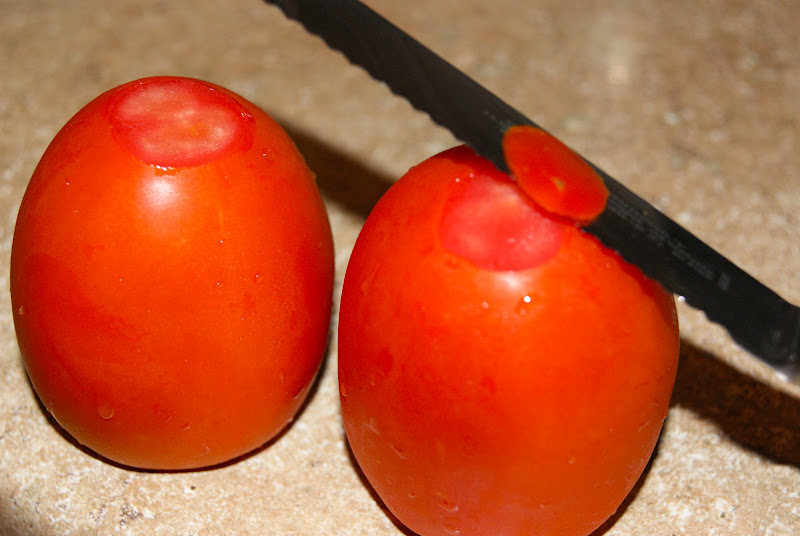
Slice the tomatoes into about 1 inch slices. (To use the ends, slice just a tiny tip off each end of the tomato to give them a footprint to stand on and the open slice on top; see picture below)
Line a baking sheet with foil and drizzle with olive oil. Lay the tomato slices on the olive oil, and drizzle the tops of the tomato slices with olive oil as well, and a good sprinkling of basil.

Now top each tomato slice with a hearty pinch of Parmesan, and a little dash of black pepper.

Roast the tomatoes at 400 degrees for about 15 minutes so that the tomatoes get roasty and heated through, and the cheese melts on top. Then finish them off under the broiler for just a few minutes to give the cheese a golden, bubbly crust on top.


They are so simple yet so divine! Look at that beautiful roasted skin, the warm juicy inside, and the bubbly basily cheese :)


I served mine alongside parmesan tilapia and creamy risotto:

Wednesday, December 7, 2011

Pecan-Coconut-Crusted Sweet Potato Casserole


I love sweet potatoes every which way: baked, canned, mashed, plain, french-fried.... but this is my favorite version of sweet potatoes! It started with a similar recipe that I found on a blog a few years ago. I made it for my family's thanksgiving table and it was a hit! Ever since then I've been making the sweet potatoes for Thanksgiving. I've slowly adapted the recipe over the years to make it even yummier :)


Well, I'm posting this too late for you to make it for your Thanksgiving this year, but you can still make it for your Christmas feast, or even just for a fancy fall meal for some special guests :) Sweet potatoes are a great healthy side dish that can be enjoyed all year, but especially at this time of year.


If you have any picky eaters who don't like sweet potatoes, you just might convert them with this one. With its smooth interior and sweet crumbly topping, this is practically a dessert! How can you not love that?!?


Let's talk about sweet potatoes really quickly;
Sweet potatoes and yams are NOT the same thing, in fact, they are not even related. Sweet potatoes are a 'root' vegetable, and yams are 'tubers'. Most likely you've never even seen a yam before. Yams are indigenous to Africa, the Caribbean, and South America. This is why the confusion started; when visitors from those tropical lands came to America and then ate the sweet potatoes common to the U.S., they called them Yams since the sweet potatoes resembled the look and flavor to the tropical variety that they were accustomed to in their tropical homelands.
Sweet potatoes, however, provide slightly more nutritional benefits. Sweet potatoes are an excellent source of fiber and Vitamin A as well as a good source of Vitamin C and Vitamin B6. In addition to fiber and vitamins, the sweet potato also provides the minerals Potassium & Manganese. In comparison, Yams do not equal the Sweet potato in ANY of these nutrients. One thing to note, though, is that both yams and sweet potatoes have a high sugar content (not like that's a surprise... they taste SWEET for a reason! Even though it's natural sugar, it's still sugar.)


Recipe (for a large 9x13 casserole):


Filling:

  • 2 large cans Sweet Potatoes (40 oz each), drained; OR about 5-6 cups cooked fresh Sweet Potatoes, peeled & chopped.
  • 1 can Sweetened Condensed Milk
  • 2 large Eggs
Topping:
  • 1 cup Brown Sugar
  • 1 cup chopped Pecans
  • 1 cup shredded Coconut
  • 1/3 cup Salted Butter, melted
Preheat oven to 350 degrees Fahreneheit.

 Combine the sweet potatoes, condensed milk, and eggs in a bowl and mix until smooth and well combined.  
**If you want to leave some more texture, just use half of the sweet potatoes to mix with the other ingredients until smooth, then stir in the other half- leaving chunks as desired. 
Spread evenly into a 9x13 casserole dish. 

 To make the topping, combine all ingredients together:

After mixed, spread evenly over top of sweet potatoes in casserole dish:


Bake at 350 degrees for 45 minutes. The top should be browned and crispy! Mmmmmm! 

Monday, September 19, 2011

Sweet Cornbread


OH MY GOODNESS! This is my favorite cornbread I've ever had! I always made boxed cornbread, but I have really, really, really been wanting to try making it from scratch. However, I have pretty high demands for cornbread; it has to be sweet, moist, it can't fall apart into dry crumbles in my hand, and it absolutely must have actual bits of corn IN it. I figured I'd have to make it a few times before I could piece together a recipe that I would approve of, but this time I got so lucky! This is my first scratch recipe of cornbread and it hit ALL the points on my checklist, and it exceeded my expectations for taste. I could eat the entire dish by myself! It tasted  kind of like that sweet corn cake that is commonly served with mexican food, but in bread form. This cornbread tastes as if that moist & buttery corn cake married sweet & soft corn bread. 


We've kind of had a couple cooler days down here in Laguna that already feel like the beginning of Fall. That always gets me so excited for cozy nights and fall baking! So I jumped on the opportunity to made a big pot of my sweet chili when Peter said that this cooler weather made him feel like chili and cornbread. This was also my big opportunity to try cornbread from scratch. If you're into sweet, moist, flavorful, perfect cornbread... this is something you might be interested in  (hehe, okay- maybe I'm biased :)


Recipe (one 8x8 baking dish): 
1 cup Flour
1 cup Cornmeal
1/2 cup Sugar
1/2 teaspoon Baking Powder
1/2 teaspoon Baking Soda
1/2 teaspoon Salt
1/2 stick Butter, melted
1/4 cup Milk (sometimes I'll use Fat Free Half & Half if I have it around -not like this is a healthy recipe or anything, but anytime you can swap in healthier ingredients- even the smallest choices- make a positive difference :) lots of small changes add up to make a big change.)
1 large Egg
1 can Cream Style Corn


Preheat the oven to 400 degrees F. Mix the 6 dry ingredients in one bowl, and the four wet ingredients in another bowl. 
Dry Ingredients:
Wet Ingredients:

After your dry and wet ingredients are each mixed well, add the dry mix into the wet bowl just until combined. Do not over mix (supposedly overmixing can result in tough, dry, hardened bread). 

Pour Batter into a buttered or well oiled 8x8 baking dish: 

Bake at 400 degrees F for about 30 minutes. 

Enjoy with some meaty, sweet 'n spicy chili:

 Just look at how moist it is, and with those sweet little juicy bits of corn in it too! Mmm!

You can even make this recipe into corn muffins if you would like, but lessen the cooking time to about 18 minutes.

Wednesday, May 11, 2011

Grilled Corn on the Cob, TWO ways!


My last post was the BBQ pulled pork sliders that were for Peter's birthday celebration. Well, we also grilled up some corn on the BBQ as a quick and easy side to go along with those easy pulled pork sandwiches. I had never grilled corn on an actual barbeque before, so we just kinda' winged it. When Peter and I were on our honeymoon, we had corn right on the beach that was roasted straight on the grill right there ... so I thought it would be fun to do it that way for his birthday! 

When I bought these ears of corn at the market, I asked a man in the produce section what was his favorite way to grill corn on the barbecue. He said that he likes to either wrap it in foil or in the corn husk. I really liked the idea of shucking the corn and then re-wrapping it in its own husk... but that was going to take too much time for this particular occasion (In my last post I explained why we didn't have much time to spend prepping in the kitchen for this BBQ birthday party :) So, I decided to try the foil wrapping method. But I also wanted to try grilling the corn naked over the fire like we had enjoyed on our honeymoon. In Bali, the naked ear of corn went straight over the fire and then butter, salt, seasonings, and any other toppings were dressed after it was roasted. 

I decided to do a little experiment by trying it both ways! and I figured we'd vote on which one was best to share with you on the blog... but they were both so good that I just have to share both.

(Enjoying our grilled corn on the beach in Bali):

For the corn that was to be wrapped in foil, I lightly buttered it before it was wrapped so that the salty, creamy butter would cook into the sweet corn. 

For the corn that was to go straight onto the grill, I went with a healthier option. I painted them with a little extra virgin olive oil (that would also help protect them on the grill since these guys had no wrapping) and sprinkled them with a dash of salt and pepper. 

**Nutrition Noteworthy: Corn is actually a WHOLE GRAIN. Yes, many people don't realize this, but it is a part of the whole grain family along with bulgur wheat, barley, quinoa, buckwheat, brown rice, oats, etc. (just to name a few of the more common whole grains that you may have heard of :). This means that corn is, like the other whole grains, an important source of protein, fiber, vitamins and minerals!**

(buttered, foil-wrapped corn):


Peter preheated the BBQ and I painted the grills with some oil and then placed all the corn, foil and no foil, right onto the grill: 


We closed the lid on the BBQ and let them grill for at least 20 minutes or so, turning them once half way through (or quarter turns every 5 minutes for more grill marks :)  
These BOTH came out SO tasty that I couldn't pick just one to share with you.   

You know how people do baked potato bars? Well, you could do a summertime/BBQ twist on that idea, by serving a 'corn on the cob bar'. Then people could dress their corn with any toppings they desire. Some fun ideas are: 
  • Butter
  • Parmesan
  • Chile Powder
  • Salt & Pepper
  • Lawry's Seasoned Salt
  • Olive Oil
  • Roasted Garlic
  • Sweet Paprika
  • Cayenne Powder
  • Mayonnaise (I know this sounds... not healthy... but it's a popular option on roasted corn found on the beaches in Mexico) -if the idea of plain mayo doesn't sit well with you, you could always serve the mayo already flavored with any of the seasonings in this list. I imagine cayenne powder would be a good one :)

Tuesday, April 5, 2011

Crispy Onion Rings


Peter is such a good sport about letting me watch my cooking shows :) Occasionally, he will even watch one with me because he knows I love it so much. That is like, oh my goodness... the best of both worlds for me! These onion rings were a recipe that came from one of those episodes that we watched together.


We came out of church on Sunday and the weather was so incredibly gorgeous, so we decided to call a bunch of friends and kick off our first BBQ of the year. Peter asked if I would make the onion rings from the cooking show that we had watched together, and he would throw some burgers on the BBQ. I was so excited to have our friends over and to try out the new recipe! Good food is even better when it's shared with good friends.


Recipe:
  • 2 large sweet onions
  • 1 1/2 cups Flour
  • 1 Tablespoon Cayenne
  • 2 teaspoons Lawry's Seasoning Salt
  • 1 Egg
  • 12 ounces (or 1 can, or 1 1/2 cups) Club Soda, COLD so that it puffs up nicely when it hits the hot oil :)
  • Salt, for sprinkling on the fresh hot rings
First, slice your onions into 1 inch rings (each large onion will make about 4 big medallions whose layers can be carefully popped out into individual rings)

In a dutch oven, heat about 1 liter of vegetable oil until it spits and spatters when you flick some water droplets into it. While your oil is getting up to temp, whisk together the flour, cayenne, Lawry's, egg, and club soda. 

Dip your rings into the coating and drop into the hot oil. They should bubble and fizz and float on top. Let it cook for about 20 seconds or so, and then flip to the other side until it is golden and crispy.
**(Only do a few rings at a time; if you dump in a bunch at once, the oil temperature will drop too much and the rings will take much longer to cook and end up soaking up a ton of oil and becoming soggy. We don't want that.)

As each ring is done cooking, pull it out and place it straight onto a plate layered with some paper towels to absorb any extra oil. Sprinkle with salt while hot, and enjoy these sweet, salty, crispy treats!

Monday, January 24, 2011

Cauliflower Mashed 'Potatoes'


Creamy, cheesy, garlic mashed.... cauliflower!? Yep. This is a great, lower carb (and low potassium for those with kidney conditions) alternative to mashed potatoes.  It is so healthy, simple and flavorful! Cauliflower is super inexpensive at the market right now, so not only is this recipe healthy but it is budget friendly too! I had never made it before, so I was skeptical as to how flavorful mashed cauliflower could be, but I experimented with adding lots of other rich flavors and it was DELICIOUS. 
Ingredients: 
1 head cauliflower, chopped
1 or 2 potatoes, peeled (optional)
1/2 medium onion, thinly sliced or chopped
2 cloves garlic, minced
1/2 cup chicken broth
1/3 cup grated parmesan cheese
salt and pepper to taste


This was so quick and easy to make. It goes very fast, so get ready, set, go...


Boil a potato in pot of water; Above that pot, fit it with a steamer basket to steam the cauliflower at the same time. While those boil/steam, caramelize your onions in extra virgin olive oil in a separate pan.
  
The secret to caramelizing onions is LOW and SLOW. Keep your heat on medium-low and stir your onions frequently so that they get a deep brown color without burning. Once your onions are smelling sweet and get a nice caramel brown appearance, toss in the minced garlic for about 30 seconds, and then add the chicken stock, a light sprinkle of salt and some ground black pepper to taste (I used about an 1/8 or 1/4 teaspoon or black pepper). Let that simmer together over low heat for about a minute. 

After all that flavor has simmered together for a little bit, add the drained, steamed cauliflower. Stir the cauliflower into all those flavors in the pan. Put a lid on it and let all that flavor steam into the cauliflower for a couple minutes.

Adding the potato is totally optional. This recipe does not need it at all, but I chose to add the potato just to keep a little more of a potato texture and flavor.

** SIDE NOTE: you might choose not to add potato, either because you want to minimize the carbs, or because you are cooking for a health condition which limits the amount of potassium you should consume (potatoes are high in potassium, which should be limited with certain conditions such as renal/kidney disease)

If you do choose to add potato, now is the time to do that. Turn off the heat, add the potato, then mash it all together to your desired consistency. (I like to leave a little texture, as opposed to being completely smooth.)

Then I added the parmesan cheese and folded it all in until it was well incorporated: 

Then I plated it up like mashed potatoes with our porterhouse steak and green beans. Looks just like garlic mashed potatoes doesn't it!

It had the same texture as mashed potatoes that I like, plus it had lots of other rich flavors from the caramelized onions, the chicken stock, and the garlic! However, if you prefer the simpler creamy taste of traditional garlic-mashed potatoes, I suppose you can easily skip some of the other ingredients here and just use milk, roasted garlic, and some butter like a traditional mashed potato recipe. I LOVED this version with adding lots of flavors together, but play around and see what you like best.

Tuesday, January 11, 2011

Seasoned, Roasted Brussel Sprouts


I know, I know... "brussel sprouts?!" Let me explain; I just got back from a visit to my old college town- San Luis Obispo, CA... which also seems to be home to the nation's BEST farmer's market (not that I'm biased or anything :) So, I visited one of my old favorite produce vendors at the farmer's market. During college, I would go to him every week to buy a flat of strawberries for my house's weekly pancake brunch that my roommates and I would host after church on Sundays. During this week's visit to SLO, I thought it would be fun to buy a flat of strawberries and bring it home to my husband so that we could reminisce about our college days. However, strawberries aren't in season!!! Duh! So..... I came home with a big bag of beautiful, fresh, bright green brussel sprouts instead. I know, not a fair substitute huh! Poor Peter. However, we (I) roasted and seasoned them and they came out so delicious that Peter sat on the couch watching the national college football championship and went through a whole bowl of them like it was popcorn! Tonight, I made them again and he told me that I did not make enough! This tells me that these brussel sprouts passed the test! :)

As usual, I will start with your shopping list:
  • Fresh Brussel Sprouts (about 10 per serving), rinsed, trimmed, and halved
  • Extra Virgin Olive Oil, enough to coat your sprouts
  • Salt and Pepper, to taste 

First, preheat your oven to 400 degrees Fahrenheit. Then, rinse the brussel sprouts and remove any 'sorry-looking' outer leaves. Then trim off the rough stem, and slice each brussel sprout in half. 

Next, toss them in a bowl and coat them with extra virgin olive oil and plenty of salt and pepper. 
After they are all well coated, dump them onto a baking sheet to go into the oven. I like to line my baking sheets with the silpat... nothing sticks to it, and it makes cleanup so easy! Then, slide them into the oven for about 30-35 minutes. 


The high heat and the olive oil are the keys to this recipe. This duo creates a wonderful, lightly crunchy outer 'crust' on the sprouts and the insides just bake into a soft tenderness. Okay, I know this might be a little bit of a stretch, but it is almost like eating a french fry! It has the crispy salty outer layer, and that delicious soft inside.


When it comes out of the oven, you can even hit 'em with a little extra drizzle of fresh EVOO and a pinch more salt for added taste and crunch.


Tonight I plated up my roasted brussel sprouts with this delicious lemon-herbed whole roasted chicken (see picture at beginning of post)Cooking the entire chicken is so easy, delicious and cost effective. This entire chicken cost me 2 dollars and some change, and it made several meals. After tonight's dinner, I pulled the rest of the meat off the bone and stuck it in the fridge in tupperware for another recipe later this week. Then I can boil the carcass in a pot with some herbs and veggies to get a tasty homemade chicken broth (then I use this broth to make a truly homemade chicken soup). Plus, it is so easy to get SUCH tender and juicy meat when cooked whole, as opposed to cooking the breast alone, for example. Anyway, that will have to be a post for another day. Unfortunately, I only caught this snapshot of the chicken as it came out of the oven:

**This was my reminder today of God's beauty. This shot was captured from the car as I drove down Pacific Coast Highway on my way home from a coffee date with some of my amazing girlfriends: