Showing posts with label Side dish. Show all posts

Wednesday, August 29, 2012

Oven-Roasted Parmesan Tomatoes


I needed a veggie side to go with our parmesan tilapia dinner, and I had some extra tomatoes in the fridge, so these delicious little treats were born :)

They are roast-y on the outside and juicy on the inside. They have a delicious golden parmesan crust and a little sprinkle of basil adds a big complimentary punch of flavor. Absolutely beautiful.

Tomatoes are even better for you when they are cooked anyway! A lot of people are worried about losing nutrients when they cook their fruits and veggies, but tomatoes are actually more powerful for you when they are cooked. That's why it's commonly recommended to include red pasta sauce into your weekly menu rotation, or canned tomatoes, tomato soup, ...any form of cooked tomatoe... like these warm little roasted tomatoes! :)
One of the great nutritional components of tomatoes is 'lycopene', and it is lycopene that is activated when heated/processed/cooked. In fact, the lycopene in a tomato is roughly 4 times more bioavailable when it is cooked (i.e. pasta sauce) rather than when eaten raw (i.e. in a salad). Lycopene is a powerful antioxidant and is believed to possibly help prevent cancer -especially prostate cancer. It is found in several fruits and veggies (mostly red-orange colored ones) but is most well known in tomatoes since they contain such high levels of lycopene. Lycopene is also fat-soluble, which means the more olive oil you eat with it, the better it is absorbed into your body :)
So let's start oilin' and cookin' our tomatoes!...

Ingredient List:
  • Tomatoes (I used Romas, but I suppose you can use any firm ones that you like or that you already have on hand)
  • Olive Oil
  • Basil (I used crushed dried Basil, but you could use fresh as well)
  • Parmesan Cheese
  • Black Pepper
Preheat the oven to 400 degrees Fahrenheit. 

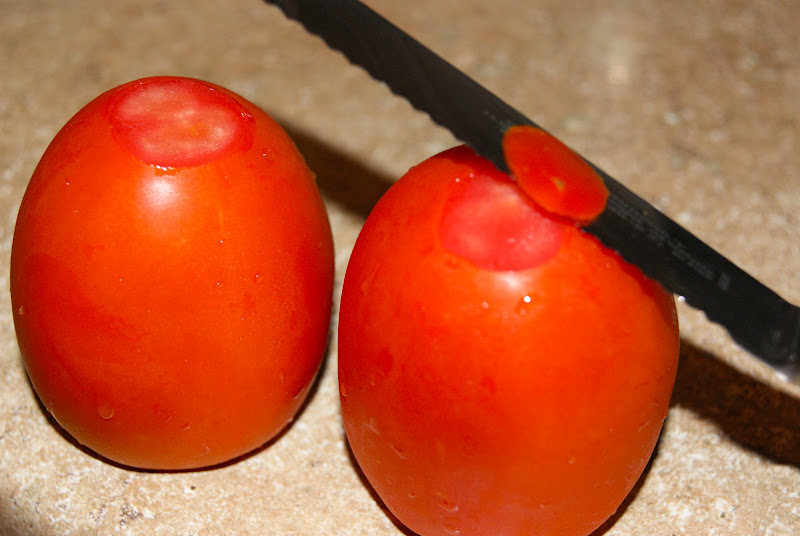
Slice the tomatoes into about 1 inch slices. (To use the ends, slice just a tiny tip off each end of the tomato to give them a footprint to stand on and the open slice on top; see picture below)
Line a baking sheet with foil and drizzle with olive oil. Lay the tomato slices on the olive oil, and drizzle the tops of the tomato slices with olive oil as well, and a good sprinkling of basil.

Now top each tomato slice with a hearty pinch of Parmesan, and a little dash of black pepper.

Roast the tomatoes at 400 degrees for about 15 minutes so that the tomatoes get roasty and heated through, and the cheese melts on top. Then finish them off under the broiler for just a few minutes to give the cheese a golden, bubbly crust on top.


They are so simple yet so divine! Look at that beautiful roasted skin, the warm juicy inside, and the bubbly basily cheese :)


I served mine alongside parmesan tilapia and creamy risotto:

Saturday, July 21, 2012

Chicken Salad Veronique


I don't know where the name came from, but that's what my mom always called it when we were growing up, so that's what I'm going to call it. 
It is pronounced 'vair-oh-neek', but Peter looks at the name and calls it "chicken salad very unique". Haha! That makes me smile :)

Whatever you choose to call it, this is a great seasonal, summer salad. So seasonal in fact, that the ingredients showed up in a cardboard box on my doorstep this morning. I subscribed to a farm fresh produce box delivery, and this was my first delivery! It is so exciting when the box shows up! It's like Christmas morning... I have no idea what's inside and I just get to rip it open and dig through to find which fresh fruits and veggies were harvested this week :) As I dug through the box, I started registering all the ingredients in my head like puzzle pieces, so that I could play with them in my mind throughout the day to figure out what I could make for dinner.


After I had my fun with the produce box, I went for a run. Though it was only 8:30  in the morning, it was already so sunny and HOT! Days like these remind me of my dad when I was a kid; he would always ask my mom to make 'chicken salad veronique' whenever it was a hot summer day. That's when it clicked for me this morning- I had most of the ingredients in my produce box already! My puzzle pieces were all put together and dinner was solved :)


This salad is cool and refreshing with its lemony dressing and juicy grapes, yet crunchy and hearty with the slivered almonds and the crisp celery.


The recipe below isn't the exact original, I altered it a bit to fit what I already had in my kitchen and to fit what I like. I get asked a lot how I come up with my recipes... this is usually how they start;  just swapping for healthier ingredients, what I have on hand in my kitchen already, and adding other flavors I think would be good complements to the dish. A lot of times I also research about a billion-gajillion other recipes and take bits and pieces that I like and put them together to come up with my own version. At the end of this post, I will outline some of the differences that I made to this original recipe in case you would like to play around with it for your own preferences as well. It's a very adaptable recipe, so feel free to experiment with some of your own changes too!


Ingredients (4 small servings):


  • 2-3 cups Chicken, cooked, cubed, & cooled (about 4-5 chicken breasts)
  • 1 cup seedless Grapes, halved
  • 1 cup Celery, sliced (about 4 stalks)
  • 1/2 cup Almonds, sliced or slivered
  • 1/3 cup Craisins
  • 1/2 cup Nonfat Greek Yogurt
  • 1/4 cup Low Fat Mayo
  • 1 teaspoon White Wine Vinegar
  • 2 teaspoons Honey
  • 1/4 cup Lemon Juice (about 2 large, or 3 small lemons)
  • 1/8 teaspoon Ground Mustard Powder
  • 1/8 teaspoon Curry Powder


You want to cook your chicken first so that it has time to cool before you assemble your salad (or use cooled leftover chicken).
*Helpful Tip: If you are cooking chicken breast for dinner earlier in the week, just cook some extra and set it aside for this salad for another day's lunch or dinner.*


Prepare the grapes and celery that you need to chop for the salad. And get the rest of the ingredients ready.


In a large bowl, combine the yogurt, LF mayo, vinegar, honey, lemon juice, ground mustard, and curry. This is your hearty dressing for the salad.


Now, just simply add all your prepared chicken, grapes, celery, almonds, and craisins to the dressing in the bowl and stir to coat. It is ready to eat right away or it is perfectly happy sitting in the fridge until you are ready to eat.


Isn't it pretty plated on a bed or ruffly red leaf lettuce :) 
I also garnished it with a little celery leaf and a few craisins for some bright polka dots of color. I always like to garnish with something that actually hints at the flavors that are within the dish. You could also garnish with a little lemon zest too! That could be fun :)


This recipe is great for brunches, for women's teas, wedding showers, for making ahead when you won't have much time later to prepare dinner, or just for those hot summer days :)


Free free to alter and swap ingredients as you please... this is a very 'swapppable' recipe :)
Also, here are the swaps I made from from the original recipe that I told you I would outline to give you some other ideas:
  • Instead of the lemon yogurt that the original recipe calls for, I substituted in real fresh lemon juice and fat free greek yogurt sweetened with a little natural honey
  • Instead of a lemon-lime alcohol bitter, I used a splash of white wine vinegar to get that same bite in the flavor. 
  • It also calls for some diced raw onion, that I omitted completely
  • I used low fat mayo instead of regular
  • I added the craisins- there's no swap here, just added it 'cuz I felt like it, plus I thought it would be nice to add just for the punch of color contrast. 
  • ...Same with the curry. No sub. Just added it entirely. The flavor works VERY well in this dish.
  • It called for deli mustart, but I just used a bit of ground mustard instead
  • I didn't do this, but you could add a little lemon zest into your salad if you really like that fresh lemon flavor, or you can just sprinkle a little zest on top for garnish. 

Sunday, April 22, 2012

Watermelon Fruit Basket


These are so fun to make. These fruit baskets can even double as a center piece on a small or crowded table since they are so cute to look at but also serve a practical purpose.

I've made these for birthdays, showers, and bbq's. This particular basket was made for our Easter brunch table this year. I kind of had to make it in a hurry because everyone was ready to eat! The boys always play wiffle ball in the backyard, and once they are called inside to eat, they are not willing to wait long or else they comment about how they could still be playing outside. hahaha :) 

First, wash your watermelon. Then, rotate it around until you find which side would make the best bottom:

Place the tip of a sharp serrated knif right under the watermelon- right there where it is touching the counter top- and gently spin the watermelon around to etch a circle under your watermelon. Then take your knife and carefully shave that circle to create a 'foot print' for your watermelon to stand on (or else it might rock back and forth later and dump your salad out)... BUT be *very cautious* NOT to break into the red part of the melon.

With your melon standing on its 'footing', take your knife tip and etch the handle and sides of the basket. Essentially, it will just be two big wedges that you are cutting out. Make sure the two sides are basically even and matching before you cut into it. 

Cut the two wedges out and save them for eating later... I gave mine to the boys that were playing wiffle ball outside. 

Then carefully slice along the underside of your basket handle and release the entire inner section of fruit. 

Then use a melon-baller to get all the fruit out of the inside of the melon basket. 
*TAKE IT EASY at the bottom of the basket. Remember that foot you cut out of the bottom? If you are too aggressive getting the melon out, you might go right through the bottom and end up with a leaky basket (I guess there are worse things in life)

Then carve any detail you like around the edge of the basket. Mine isn't the prettiest or most professional-looking (since the boys were on their way in), but you get the idea here:

Then mix your melon balls with any fruit assortment you like for a fruit salad. Here is the final product presented on our easter brunch table:

I usually like to decorate around my basket with pretty and edible foliage, like grape leaves on a curly vine or bright orange nasturtiums.

Since your are removing all the melon from inside the basket and then filling all that melon PLUS other fruits back into the shell, you will have enough mixed fruit salad to fill and refill the fruit 'basket'.

Sunday, February 12, 2012

Sweet & Salty Jello Salad


If this is a 'salad' then I'm fired as a Nutritionist. But, for lack of a better name, my family calls this a Jello salad. We serve it as a side with dinner, but in truth- this is more like a dessert. It is SO SCRUMPTIOUS. The bottom layer is made of a crushed pretzel crust and it is so buttery & salty & crunchy. The top layers create a strawberry-cheesecakeish effect that is creamy & sweet & smooth. All of these complimentary opposites make this dish absolutely irresistible. Everyone at your table will have seconds! 


It was recently my sister-in-law's birthday and this was one of her specific requests for her birthday dinner. It was a good choice because it's something that everyone is always happy with. 
There was one lonesome serving that made it back home with us, and the next morning Peter said he wanted it with breakfast. I tried to just laugh and pass it off as a joke... but as I stood in front of my griddle making french toast- the next thing I knew Peter was sitting at the table with a fork in hand and the last piece in front of him! Oh geez! Dessert before breakfast!?


This recipe came from one of our close family friends, Theresa. Theresa is one of my mom's best friends; She's part of a group of ladies that are like a second set of aunties to me and my siblings. Theresa originally got this recipe from her mother-in-law... If a recipe has been passed down and around that much, then it's definitely a keeper. 


Recipe (makes one 9x13 casserole dish):
  • 1 1/2 cups coarsely crumbled Pretzels
  • 1/2 cup Butter (1 stick)
  • 3 Tablespoons Brown Sugar
  • 1 (6oz) box of Strawberry Jello
  • 2 cups Boiling Water
  • 1 cup Ice Water
  • 16 ozs sliced Strawberries (I use a frozen package that has been thawed, but you can use fresh if they are in season)
  • 1 small (10 oz) container of Cool Whip
  • 1 cup White Granulated Sugar
  • 8 oz package Cream Cheese
*This can EASILY be made healthier by using using a sugar free Jello, light cream cheese and/or Neufchatel cheese, and by using half the amount of cool whip/sugar/and cream cheese. 
...still doesn't make it 'healthy', but will make it healthier.


Melt Butter and brown sugar together and remove from heat. Stir in the crushed pretzels and spread mixture into a sprayed/greased 9x13 dish. Bake 10-12 min in preheated 350 degree F oven. Set aside (or in fridge) to cool completely.


Mix together jello in boiling water and stir for 2 minutes until all dissolved. Then add the ice-cold water (without the ice) and sliced strawberries. Stir well and allow to cool and thicken slightly in fridge, but not till it's completely firm or else you won't be able to pour it on as the top layer.


While the two other components are cooling, whip together cool whip, cream cheese, and sugar.

Spread evenly over the COMPLETELY COOLED pretzel crust.

Then top with the slightly chilled jello mix.

Enjoy! ...it's hard to take a picture of jello that looks pretty, but I promise this is DELICIOUS!


For an elegant presentation, try serving it...

  • on a leaf of Bibb lettuce,
  • with a dollop of cool whip, 
  • with a strawberry on top, 
  • with a sprig of mint on top,
  • or ALL of the above :)

Wednesday, December 7, 2011

Pecan-Coconut-Crusted Sweet Potato Casserole


I love sweet potatoes every which way: baked, canned, mashed, plain, french-fried.... but this is my favorite version of sweet potatoes! It started with a similar recipe that I found on a blog a few years ago. I made it for my family's thanksgiving table and it was a hit! Ever since then I've been making the sweet potatoes for Thanksgiving. I've slowly adapted the recipe over the years to make it even yummier :)


Well, I'm posting this too late for you to make it for your Thanksgiving this year, but you can still make it for your Christmas feast, or even just for a fancy fall meal for some special guests :) Sweet potatoes are a great healthy side dish that can be enjoyed all year, but especially at this time of year.


If you have any picky eaters who don't like sweet potatoes, you just might convert them with this one. With its smooth interior and sweet crumbly topping, this is practically a dessert! How can you not love that?!?


Let's talk about sweet potatoes really quickly;
Sweet potatoes and yams are NOT the same thing, in fact, they are not even related. Sweet potatoes are a 'root' vegetable, and yams are 'tubers'. Most likely you've never even seen a yam before. Yams are indigenous to Africa, the Caribbean, and South America. This is why the confusion started; when visitors from those tropical lands came to America and then ate the sweet potatoes common to the U.S., they called them Yams since the sweet potatoes resembled the look and flavor to the tropical variety that they were accustomed to in their tropical homelands.
Sweet potatoes, however, provide slightly more nutritional benefits. Sweet potatoes are an excellent source of fiber and Vitamin A as well as a good source of Vitamin C and Vitamin B6. In addition to fiber and vitamins, the sweet potato also provides the minerals Potassium & Manganese. In comparison, Yams do not equal the Sweet potato in ANY of these nutrients. One thing to note, though, is that both yams and sweet potatoes have a high sugar content (not like that's a surprise... they taste SWEET for a reason! Even though it's natural sugar, it's still sugar.)


Recipe (for a large 9x13 casserole):


Filling:

  • 2 large cans Sweet Potatoes (40 oz each), drained; OR about 5-6 cups cooked fresh Sweet Potatoes, peeled & chopped.
  • 1 can Sweetened Condensed Milk
  • 2 large Eggs
Topping:
  • 1 cup Brown Sugar
  • 1 cup chopped Pecans
  • 1 cup shredded Coconut
  • 1/3 cup Salted Butter, melted
Preheat oven to 350 degrees Fahreneheit.

 Combine the sweet potatoes, condensed milk, and eggs in a bowl and mix until smooth and well combined.  
**If you want to leave some more texture, just use half of the sweet potatoes to mix with the other ingredients until smooth, then stir in the other half- leaving chunks as desired. 
Spread evenly into a 9x13 casserole dish. 

 To make the topping, combine all ingredients together:

After mixed, spread evenly over top of sweet potatoes in casserole dish:


Bake at 350 degrees for 45 minutes. The top should be browned and crispy! Mmmmmm! 

Friday, November 18, 2011

Roasted Garlic Hummus

Hummus is a super healthy snack. I don't have a lot of 'snacky' stuff in my house- I just keep a lot of ingredients stocked up in my kitchen, so if you get snacky you better be willing to wait for something to get made. I know, "poor Peter". But HUMMUS- now this is something I don't mind having on hand for snacking! Peter has loved having this homemade hummus in the house. It even helps me to get him to eat carrots and celery :)


Hummus is so healthy because it is high in iron, vitamins, & fiber... but most uniquely, it is a good source of a 'complete' protein. Our body uses over 20 amino acids to make protein and perform various functions in our body. Our bodies can actually make most of these amino acids on their own. However there are 9 that our body cannot make sufficiently for growth, so it is essential that we get them from the foods we eat. This is why they are called 'essential amino acids'. 
Certain foods compliment each other to create a complete protein. For example: 

  • Chickpeas have sufficient amounts of all the essential amino acids EXCEPT tryptophan and methionine. 
  • HOWEVER, seeds and grains happen to be rich in tryptophan and methionine, and low in some of the other ess. amino acids that the chickpeas do have. 
  • THEREFORE, when we combine the chickpeas with tahini (sesame seed paste) and serve it with grains (from the pita bread) you have sufficiently rich levels of ALL the essential amino acids.
i.e. you have a complete protein!


Recipe (makes about 2-3 cups):
1 can Chickpeas (aka garbanzo beans), drained
3 heaping Tablespoons of Tahini
Juice of one small Lemon (1/4 cup)
1/4-1/2 teaspoon Cumin (depending on your liking)
a few dashes of Paprika
1/8 teaspoon Cayenne Pepper
1/4 cup Water (as needed)
1 small head Roasted Garlic (about 12 cloves)
1/4 cup Extra Virgin Olive Oil


It is super easy to make your own roasted garlic. Just slice your head of garlic in half, cross wise, then drizzle with EVOO and sprinkle lightly with salt. Wrap each half in a square of foil and roast at 400 degrees F for about 40 minutes. 


Place all ingredients, except olive oil, in food processor and blend until it becomes a thick paste.

Then AS THE PROCESSOR IS RUNNING drizzle in the olive oil until you get the desired consistency, though it should be thick.


Serve with pita bread, carrots, bell pepper slices, and/or celery sticks.

Garnishing options:

Drizzle with olive oil
Sprinkle with Paprika
Sprinkle with Cayenne
Top with chopped Parsley

Monday, September 19, 2011

Sweet Cornbread


OH MY GOODNESS! This is my favorite cornbread I've ever had! I always made boxed cornbread, but I have really, really, really been wanting to try making it from scratch. However, I have pretty high demands for cornbread; it has to be sweet, moist, it can't fall apart into dry crumbles in my hand, and it absolutely must have actual bits of corn IN it. I figured I'd have to make it a few times before I could piece together a recipe that I would approve of, but this time I got so lucky! This is my first scratch recipe of cornbread and it hit ALL the points on my checklist, and it exceeded my expectations for taste. I could eat the entire dish by myself! It tasted  kind of like that sweet corn cake that is commonly served with mexican food, but in bread form. This cornbread tastes as if that moist & buttery corn cake married sweet & soft corn bread. 


We've kind of had a couple cooler days down here in Laguna that already feel like the beginning of Fall. That always gets me so excited for cozy nights and fall baking! So I jumped on the opportunity to made a big pot of my sweet chili when Peter said that this cooler weather made him feel like chili and cornbread. This was also my big opportunity to try cornbread from scratch. If you're into sweet, moist, flavorful, perfect cornbread... this is something you might be interested in  (hehe, okay- maybe I'm biased :)


Recipe (one 8x8 baking dish): 
1 cup Flour
1 cup Cornmeal
1/2 cup Sugar
1/2 teaspoon Baking Powder
1/2 teaspoon Baking Soda
1/2 teaspoon Salt
1/2 stick Butter, melted
1/4 cup Milk (sometimes I'll use Fat Free Half & Half if I have it around -not like this is a healthy recipe or anything, but anytime you can swap in healthier ingredients- even the smallest choices- make a positive difference :) lots of small changes add up to make a big change.)
1 large Egg
1 can Cream Style Corn


Preheat the oven to 400 degrees F. Mix the 6 dry ingredients in one bowl, and the four wet ingredients in another bowl. 
Dry Ingredients:
Wet Ingredients:

After your dry and wet ingredients are each mixed well, add the dry mix into the wet bowl just until combined. Do not over mix (supposedly overmixing can result in tough, dry, hardened bread). 

Pour Batter into a buttered or well oiled 8x8 baking dish: 

Bake at 400 degrees F for about 30 minutes. 

Enjoy with some meaty, sweet 'n spicy chili:

 Just look at how moist it is, and with those sweet little juicy bits of corn in it too! Mmm!

You can even make this recipe into corn muffins if you would like, but lessen the cooking time to about 18 minutes.