Monday, November 7, 2011

Chicken Enchilada Casserole


THIS is the family favorite. My mom made this for our fam when we were growing up. It makes a large casserole, but there were hardly ever any leftovers. Even if there were a little bit of leftovers, they definitely didn't last past lunchtime the next day. To this day, this is the most requested birthday item from everyone in my family. 
In fact, this time that I made it, it was per request from my brother and sister-in-law when they came home from the hospital with their new baby boy. 


Rather than the traditional chicken enchilada which has individual rolled enchiladas, this one is a layered chicken enchilada casserole. I love casseroles because they are easy to assemble, all the flavor is trapped together in one dish, and they are great for feeding a crowd.  
This recipe makes a large 9x13 casserole, however I made two 8x8 casseroles this time; one for Peter and I, and one to take over to Cullen and Ashley's when they got home from the hospital.


For this enchilada, there are only 3 parts that get layered together: tortillas, chicken, and sauce:


The chicken is as easy as plain cooked chicken that is chopped or shredded. In a pinch, a rotisserie chicken works VERY well for this recipe. This time, I cooked a whole chicken and shredded all of its meat for this casserole.


Some enchiladas allow you to use corn or flour tortillas, but I would urge you NOT to use flour for this one. I've made it with flour tortillas once and I will never make that mistake again. It came out too soggy :( Besides, corn is healthier anyway :) For these enchiladas, just stick to corn tortillas.


Recipe (makes a large 9x13 casserole dish):

  • 1 can Cream of Chicken soup
  • 1 can Cream of Mushroom soup
  • one 24 oz jar Salsa, I use 'medium' spice (the 'La Victoria' style of salsa)
  • 16 oz Shredded Cheddar, plus 8 oz Shredded Cheddar; divided
  • 1/2 to 1 cup Milk (I use fat free)... not necessary for flavor, so if you don't have the milk, don't stress; it just helps to thin and stretch the sauce so that you have enough for the top (which is pretty important)
  • 24 Corn Tortillas
  • about 4 cups Chicken, cooked & shredded (4 large Chicken Breasts or the meat of one Whole Cooked Chicken)
  • For serving: Sour Cream, or a healthier option- Guacamole!


First, mix together the can of Cream of Chicken soup, the can of Cream of Mushroom soup, the jar of Salsa (reserve a few spoonfuls for the bottom of the baking dish), and 16 oz shredded cheddar, and the milk. 
(The cup of milk does not affect the cooking or flavor of this dish, but if you have a cup of milk it helps to make this sauce stretch a little further; it's important that you have enough of this sauce as you layer because this needs to be the top layer covering the casserole.) 
It makes a great looking pink sauce... Peter always sneaks over with a bag of tortilla chips at this point and starts dipping into this sauce- until I whack him with my spoon :)
  
Now slice your tortillas into 1 inch strips (they already have lines baked into them, so I just pile a handful at a time and slice the stacks all at once along the guide lines.)

I roasted a whole chicken and shredded it for this dish, so I used some of the chicken broth juices from the roasting pan to cover the bottom of the enchilada dish. If you do not have the cooked chicken broth, then you can use a few spoonfuls of salsa, or even spread a bit of your cheesy-pink enchilada sauce. 
(If you do not put something down there, the dry tortilla strips might bake hard onto the casserole dish)

Lay out your tortilla strips to cover the bottom of the pan:

Then layer 1/3 of your shredded chicken:

Then 1/3 of your sauce:

Repeat, ENDING WITH THE SAUCE. This is important. If you end with a layer of tortillas or chicken, it will bake all hard and dried out. No es bueno!
Then cover the top layer of sauce with 8 ounces or so of shredded cheddar (my favorite part- the ooey gooey cheesy crust :)

Bake at 350 degrees F until the cheese bakes golden brown and bubbly (about 45 minutes): 

Let is sit for about 10-15 minutes before you cut into it. This will allow it to cool slightly, and to firm up. Otherwise, you will cut a serving and it will ooze off the spatula and all over the plate. It will taste great, but it won't look as appetizing. So let it sit for a little!
Delicious served with a healthy side of yummy guacamole!

This is one meal that gets even better the day after because all the flavors marry together even better as they sit. Unfortunately, leftovers (if any) hardly last long enough. 

...A good solution to this could actually be even easier for you; make it ahead of time! When you are ready to bake it, pull it from the fridge, bring it to room temp, and then pop it in the oven at 350 for 45 minutes. A flavorful, filling meal that's ready when you are! That's why I love casseroles :)

Monday, October 31, 2011

Caramel Corn


All the boys had another guys weekend up in San Luis Obispo, so we got another girls weekend in Laguna :) Last time we had a picnic at The Montage and played croquet. This time, we had a girls slumber party and we made homemade ice cream and caramel corn! Believe it or not, I still think we ate healthier than the boys did this weekend, haha. 
Laurie shared her mom's recipe for caramel corn and it was soooooo good. And easy too! It only takes about 5 minutes of work to actually make it, but then it sits in the oven for about another hour before it's ready. Overall, I was surprised at how simple it was to make homemade caramel and get delicious crunchy caramel corn on demand!
Since our girls weekend, I've now made it again on my own. This time, Peter and I were entertaining friends visiting from SLO :) We played a domino game, 'Mexican Train', which requires extra game pieces to use as markers that you put on and off of your domino 'train'. However, in the absence of the game pieces, we used caramel corn as markers in the game. When someone earned a marker, they would grab a piece of caramel corn; and when they earned the right to take it off... they would pop it right into their mouth. It was a fun way to snack and play at the same time :) Between the handfuls that were eaten, and the 'markers' that were gobbled, the entire bowl of carmel corn was gone by the end of the evening!


Recipe:

  • 20-24 cups of plain Popped Corn (from about 1 cup unpopped kernels)
  • 2 cups Light Brown Sugar
  • 1 cup (2 cubes) Salted Butter
  • 1/2 cup Light Corn Syrup
  • 1 teaspoon Salt
  • 1/2 teaspoon Baking Soda
  • 1 teaspoon Vanilla
  • *(optional: 3 cups Peanuts)
Preheat the oven to 250 degrees Fahrenheit. Then pop your corn kernels. They need to be ready because once the carmel is ready, everything has to move FAST, so there's no time to waste popping corn.

I used the good old air popper that I grew up with. These have a max capacity of 1/2 cup kernels at a time, so I did two batches (totally 1/2 cup kernels) and this yielded a perfect amount of popped corn for this recipe (you will also need 2 big bowls for this amount of volume):


Once your corn is popped, start the caramel: 
Mix together the brown sugar, butter, corn syrup, and salt  in a large pot over medium heat.
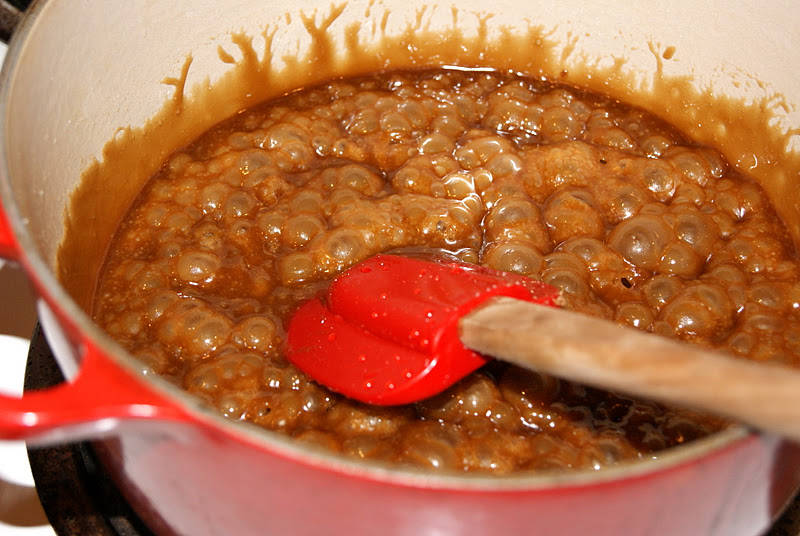
Bring to a boil, stirring constantly. Boil for no more than 5 minutes:

 After your caramel has boiled for just about 5 minutes, add the baking soda and vanilla. It will PUFF up and become light and fluffy... almost like marshmallow fluff, but not quite as thick and sticky. Once it is stirred, pour it immediately onto your popcorn...

 Gently stir the carmel by folding the caramel into the popped corn until it is well coated
(Stir in peanuts at this time, if using):


Spread the bowls of carmel coated corn over two baking sheets lined with parchment or silpat. 
Don't worry, I know it is still a bit sticky and clumpy at this time, but spread it out well, and it will eventually crackle apart after it bakes. 
Bake at 250 degrees for 1 hour to 1 hour 15 minutes, stirring half way. 

Once the caramel corn is done baking, spread over wax paper to cool and harden:

This only takes about 5 minutes for the caramel corn to cool until it is ready to enjoy!


It is such a yummy, crunchy, sweet treat, that it will disappear in just as much time as it took to make it... especially if it is part of game night :)

Friday, October 28, 2011

Chewy Molasses Cookies


I shared a story in my oatmeal bread post about the sweet, sticky, treat-- molasses! Oh I just love it! When Becky was teaching me how to make that oatmeal bread and was sharing her molasses story with me, I asked her if she knew of molasses cookies. She said that they love the molasses cookies from Trader Joes. On my next visit to Trader Joes, I headed over to the cookie bags and inspected their molasses cookies. How thick were they? What consistency did they have? Were they soft or crunchy? 
I came home and researched a TON of molasses cookie recipes. I got to pick and choose certain things I liked from each recipe, that I thought would yield the desired result.
Here is the final product for chewy, sweet molasses cookies. A great, rich (almost ginger snap) flavor for holiday cookie baking!

Recipe: 
¾ cup (1 ½ sticks) butter
1 cup packed brown sugar
¼ cup molasses


1 large egg

1 tsp cinnamon
¼  tsp nutmeg
¼ tsp salt
1 ½ tsps baking soda

2 cups flour

¼ cup granulated sugar for rolling

Cream together the butter, brown sugar, and molasses. Then mix in the egg, then cinnamon, nutmeg, salt, baking soda, and finally the flour:

Roll dough balls between your hands and then roll them in a bowl of granulated sugar. Place at least an inch apart on your cookie sheet:

Bake at 350 degrees for 10 minutes... they will look like puff balls, but take them out after no more than 10 minutes, and they will flatten out as they cool into their nice dense chewiness!

Let cool for a few minutes on a wire cooling rack.