Wednesday, August 29, 2012

Oven-Roasted Parmesan Tomatoes


I needed a veggie side to go with our parmesan tilapia dinner, and I had some extra tomatoes in the fridge, so these delicious little treats were born :)

They are roast-y on the outside and juicy on the inside. They have a delicious golden parmesan crust and a little sprinkle of basil adds a big complimentary punch of flavor. Absolutely beautiful.

Tomatoes are even better for you when they are cooked anyway! A lot of people are worried about losing nutrients when they cook their fruits and veggies, but tomatoes are actually more powerful for you when they are cooked. That's why it's commonly recommended to include red pasta sauce into your weekly menu rotation, or canned tomatoes, tomato soup, ...any form of cooked tomatoe... like these warm little roasted tomatoes! :)
One of the great nutritional components of tomatoes is 'lycopene', and it is lycopene that is activated when heated/processed/cooked. In fact, the lycopene in a tomato is roughly 4 times more bioavailable when it is cooked (i.e. pasta sauce) rather than when eaten raw (i.e. in a salad). Lycopene is a powerful antioxidant and is believed to possibly help prevent cancer -especially prostate cancer. It is found in several fruits and veggies (mostly red-orange colored ones) but is most well known in tomatoes since they contain such high levels of lycopene. Lycopene is also fat-soluble, which means the more olive oil you eat with it, the better it is absorbed into your body :)
So let's start oilin' and cookin' our tomatoes!...

Ingredient List:
  • Tomatoes (I used Romas, but I suppose you can use any firm ones that you like or that you already have on hand)
  • Olive Oil
  • Basil (I used crushed dried Basil, but you could use fresh as well)
  • Parmesan Cheese
  • Black Pepper
Preheat the oven to 400 degrees Fahrenheit. 

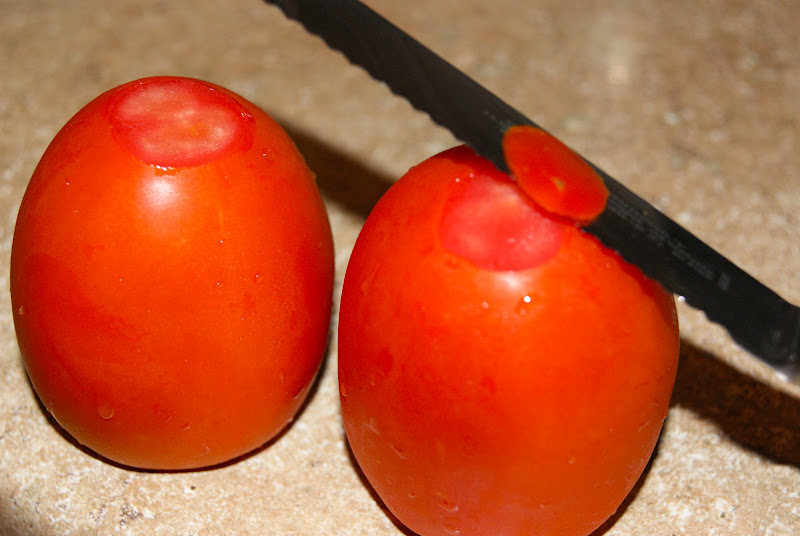
Slice the tomatoes into about 1 inch slices. (To use the ends, slice just a tiny tip off each end of the tomato to give them a footprint to stand on and the open slice on top; see picture below)

Line a baking sheet with foil and drizzle with olive oil. Lay the tomato slices on the olive oil, and drizzle the tops of the tomato slices with olive oil as well, and a good sprinkling of basil.

Now top each tomato slice with a hearty pinch of Parmesan, and a little dash of black pepper.

Roast the tomatoes at 400 degrees for about 15 minutes so that the tomatoes get roasty and heated through, and the cheese melts on top. Then finish them off under the broiler for just a few minutes to give the cheese a golden, bubbly crust on top.


They are so simple yet so divine! Look at that beautiful roasted skin, the warm juicy inside, and the bubbly basily cheese :)


I served mine alongside parmesan tilapia and creamy risotto:

Thursday, August 23, 2012

Parmesan-Crusted Tilapia


Tilapia is a great fish if you're cooking for a mixed group; it is tender and flakey enough for fish-lovers, yet mild enough that non-fish-lovers definitely enjoy it too. Tilapia is a very mild white fish and doesn't taste 'fishy' at all. It is usually a great one for beginners. 

Parmesan cheese has a strong sharp flavor that is perfect for flavoring this mild filet of fish. The paprika and parsley are more for color and visual appeal than for flavor. Interestingly enough though, dried parsley is a surprising nutritious source of lycopene- the antioxidant most well known as one of the great health components of tomatoes. (Which reminds me that I also served these tasty filets with roasted tomatoes -another post where I discuss lycopene in more detail).

I accompanied this tilapia with creamy risotto and roasted tomatoes. If you have all your ingredients ready to go, you can make this entire meal in 30 minutes start to finish. We'll start with the fish...

Recipe (makes 4 tilapia filets):

  • Four 4 oz. Tilapia filets
  • 1/2 cup grated Parmesan Cheese
  • 1 1/2 teaspoons ground Paprika
  • 1 1/2 teaspoons dried Parsley
  • a couple shakes of ground Black Pepper
  • Olive Oil

Preheat the oven to 400 degrees Fahrenheit. Cover a rimmed baking sheet with foil, and drizzle a little olive oil on the foil so that it's ready for the fish.

Mix the parmesan, paprika, parsley, and pepper in a dish.


Gently pat the fish filets dry with a paper towel, and drizzle with some olive oil.


Sprinkle the parm-mixture evenly over each of the filets, gently pressing it into the olive oil on each side -especially on the top :)
Lay the filets on the olive-oiled-foil ...trust me, do not skip the olive oil here! Fish is tender and flakey and it would be terrible if your beautiful filets fell to pieces because they stuck to the foil while trying to get them off.

Bake at 400 F for 15 minutes or until the parmesan topping is golden and the fish is cooked through.

They are GORGEOUS, HEALTHY and DELICIOUS. And SO easy! Who knew!? 


That is a delicious crust on the fish, and see how beautifully the paprika colored it!
Just look at how wonderfully flakey it is! No mushy fish here :)

I served my tilapia filets with creamy risotto and roasted tomatoes. You can have this entire healthy, fancy meal on the table in just 30 minutes!

Friday, July 27, 2012

Fresh Fruit Tart


Peter and I just got back from a trip to Seattle and I just fell in LOVE with the Pikes Place Market!!! All the beautiful, colorful, produce was almost too overwhelming for me- I just wished that we had a kitchen there so that I could have an excuse to carry bags of the gorgeous fresh groceries home with me.
Alas, I had no kitchen to cook in; instead, Peter graciously started each day by taking me for a morning stroll through the market so that I could gawk and soak in the market culture that I loved to feel a part of. 

They had these huge, super juicy, sweet yellow peaches that that all the produce vendors called 'OMG' peaches or 'Oh My Goodness' peaches. I had to go visit the peaches everyday just to make sure they were still as sweet as the day before :)

When we returned home, though I didn't have Pikes Place to go to for my fresh fruit, I did get a Farm-to-Home produce box delivery! What perfect timing! It even included peaches! With so much beautiful fruit in my box, I thought a fruit tart would be perfect to make! I had the fruit, the only problem was that I didn't have a tart pan to make it in. The fruit had already magically showed up for me on my doorstep... and guess what- 1 day later, SO DID THE TART DISH I NEEDED!!! Well, it didn't show up on my doorstep, but I showed up on it's doorstep.. at a garage sale right in my own neighborhood! This was too good to be true; this tart was meant to happen!

Along with the cute white fluted tart dish, I also found a couple other thrifty finds from this 91 year old woman's garage sale:
A gorgeous antique glass vanity box with aged metal edging and claw feet, AND a cool anniversary clock glass dome. 
I filled the glass vanity box with turquoise sand from an hour glass that had broke in my living room. Then I nested a pink sea shell from my personal collection inside. 
I placed the clock dome over a flat, round, mirrored pillar candle base and displayed a beautiful piece of white coral within. 
I love repurposing my treasures to create unique beach decor for our little Laguna Beach cottage :)


Okay, enough of the nonedibles. Down to the tart business! This fruit tart is beautifully impressive looking, but incredibly easy to make. It is almost a 'no-cook' recipe. It has a shortbread crust (only 3 ingredients -and the only baked component), a cheesecake-ish filling, fresh fruit, and a lemon glaze. 

This tart is awesome for all of summertime's bountiful fruit, but you can make it all year round with whatever fruit is in season. It could also be fun to try adding some slivered nuts into the design. 


Ingredients (makes a 12" tart): 

Shortbread Crust: 
  • 1 1/2 cups AP Flour
  • 1/2 cup Powdered Sugar
  • 1 1/2 sticks Salted Butter, chilled and diced
    • (optional: 1 teaspoon Almond Extract)
Cheesecake Filling: 
    • 8 oz. Cream Cheese (Low fat optional)
    • 1/2 cup Sugar
    • 1 teaspoon Vanilla Extract
    • Any Fresh Fruit you like (to give you an idea, the design pictured in my post here used 6 strawberries, 1/2 white peach, 1/2 yellow peach, a kiwi, and a handful of blueberries)
    (Optional Glaze):
      • 1/4 cup fresh Lemon Juice
      • 1/4 cup Water
      • 1/4 cup Sugar
      • 1 Tablespoon Corn Starch
    Place the crust ingredients in a food processor and pulse until for about 1minute until it clumps together enough that when you squeeze it in your hand it will combine to become like playdough.

     
    Press the dough into the tart pan. (You can do this way in advance and chill it covered with plastic wrap in the fridge until you're ready to bake it). 

    Bake at 350 degrees Fahrenheit for about 12 minutes, or until it just barely begins to golden. Be careful not to over bake.

    *Note, make sure the crust is cooled before you fill it

    Next, mix the filling ingredients. (again, this can be done way in advance as well -stored, covered, and in the fridge until ready for use)

    Spread the filling evenly into the cooled shortbread crust.

    Then have fun decorating with your sliced fruits, but don't put on the berries until after you've painted the glaze. It doesn't ruin the berries or anything, but the berries don't stay in place like the other fruit does while painting the glaze. Plus, the glaze works as somewhat of an adhesive to keep the berries in place when you set them around the top :)

    You don't HAVE to use the glaze (though I highly recommend it) on your tart, but it is good for a few reasons: 1) it makes the fruit super glossy and appealing looking, 2) if you make your tart ahead of time, it can help to prevent the fruit from drying out or turning brown, and 3) IT TASTES GOOD too!

    If using, you can mix all the glaze ingredients together with a fork or a whisk and bring it to a light boil in a saucepan until it thickens, or just microwave it in a pyrex measuring cup for about 30 seconds to thicken it. 
    If it gets too thick to paint, just stir in a little water to thin it out a little bit. If it isn't thick enough, heat it a little longer until it thickens more.

    Paint the glaze over the fruit, and then polka dot any berries on top.

    See that beautiful glossy shine!
    You can see the ring of alternating yellow and white peach slices, the strawberry border, the kiwi center, and the blueberry polka dots. 

    And here my new tart dish even fits perfectly atop the cake stand I got from Aunt Peggy at my bridal shower 2 years ago!


    Isn't it just lovely! I LOVE all the colors! 
    It's so fun playing around with the natural shapes and colors to see what patterns and designs you can make with them!